Kitchen Sink Strainers: Basket Leaks, Putty, and Replacement

The kitchen sink strainer is the metal or plastic assembly that sits in the drain opening of a sink without a garbage disposal. It catches food scraps, holds a stopper so the basin can be filled, and forms the watertight joint between the sink bowl and the drain pipes below. It is also one of the most common sources of the slow drip that shows up as a stained, swollen cabinet floor. Because the strainer, the tailpiece and the trap all sit within a foot of each other, a leak under the sink is easy to misdiagnose. This guide explains how a basket strainer assembly is put together, why it leaks, when plumber’s putty or silicone belongs under the flange, how to pinpoint where water is actually coming from, the basic replacement steps, the difference between basket stoppers and mesh inserts, how disposal flanges differ and what the work typically costs.
Part of our Plumbing & Water guide — start there for the full picture →
How a Kitchen Basket Strainer Is Built
A typical kitchen basket strainer has several parts that stack together through the sink’s drain opening, which is usually about 3.5 inches in diameter on standard kitchen sinks:
- Strainer body and flange. The visible rim sits inside the sink. Its underside is sealed to the sink with plumber’s putty or, for some sinks, a gasket or sealant specified by the manufacturer.
- Rubber gasket. A thick rubber washer slides up the threaded body from underneath and presses against the bottom of the sink.
- Fiber or friction gasket. A thin paper, fiber or plastic washer sits between the rubber gasket and the locknut so the nut can turn without twisting and tearing the rubber.
- Locknut. A large nut, metal or plastic, threads onto the body and clamps the whole assembly to the sink. Some designs use a retainer with three screws instead of one big nut.
- Tailpiece coupling. A smaller coupling nut and washer connect the strainer body to the vertical tailpiece that runs down to the trap or a continuous waste fitting.
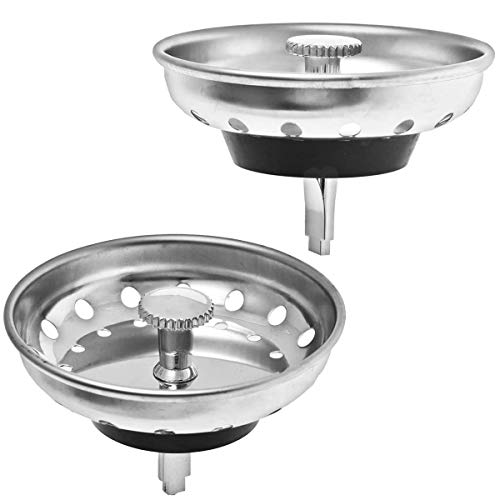
- The basket. The removable basket or stopper sits inside the body and catches debris.
Every one of those joints is a potential leak point, which is why the first step with any under-sink drip is identifying exactly which joint is wet.
Plumber’s Putty or Silicone Under the Flange?
For decades the standard way to seal a strainer flange to a sink has been a rope of plumber’s putty pressed into the underside of the rim. Putty stays soft, fills small irregularities in the sink surface, and makes the strainer easy to remove years later. It works well on stainless steel and enameled cast iron sinks in most cases.
There are exceptions. Some putty formulations can stain or discolor certain natural stone, quartz and composite (granite-composite) sinks, and some sink and strainer manufacturers specify a stain-free putty, a silicone sealant or only the supplied gasket. In those cases, a bead of silicone caulk may be the recommended sealant, though it makes future removal harder. Some modern strainers come with a foam or rubber gasket designed to go under the flange with no putty at all. The sink and strainer instructions decide which applies, and using the wrong compound on an expensive composite sink can leave a permanent ring.
Why strainers start leaking
- Dried or washed-out putty. Over many years, putty can harden, crack or wash out, especially if the strainer has been loosened or bumped.
- A loose locknut. Heavy pots dropped on the strainer, or someone leaning on the tailpiece, can loosen the nut.
- Torn or hardened gaskets. Rubber gaskets compress and crack with age and heat.
- Corroded bodies. Cheap plated strainers can corrode through at the threads or the bottom of the body.
- Overtightening. A nut cranked too hard can distort a thin stainless sink or crack a plastic body.
Best Sink Strainer: our top 3 picks
| Product | Best for | Key features | Price | Buy |
|---|---|---|---|---|
| Hilltop KSS-0024 Combo | Best strainer and stopper basket |
| $6.29as of Oct 30, 2026 3:10 am GMT+0000 | Buy now →Check current price |
| OXO Good Grips Silicone | No-scratch basket that inverts |
| $11.88as of Oct 30, 2026 3:10 am GMT+0000 | Buy now →Check current price |
| wokdada Chain Mesh | Large capacity, flip to empty |
| $14.99as of Oct 30, 2026 3:10 am GMT+0000 | Buy now →Check current price |


Prices are Amazon’s listed prices as of the time shown and change often; check Amazon for today’s price. As an Amazon Associate we earn from qualifying purchases.
Strainer Leak, Slip-Nut Leak or P-Trap Leak?
Under-sink leaks tend to travel. Water runs along the outside of pipes and drips from the lowest point, so the puddle is often nowhere near the actual source. A simple diagnostic routine helps:
- Dry everything. Wipe the underside of the sink, the strainer body, the tailpiece and the trap completely dry. Lay a paper towel or a sheet of newspaper on the cabinet floor.
- Test the flange seal. Put the stopper in, fill the basin a few inches, and wait several minutes without draining. If the underside of the sink around the strainer gets wet, the flange seal or the gaskets are failing.
- Test the drain joints. Pull the stopper and let the full basin drain. Water moving through the system under flow reveals leaks at the tailpiece coupling and the slip nuts.
- Feel each joint. Run a dry tissue around the strainer locknut, the tailpiece coupling, each slip nut, and the trap. The first damp spot from the top down is usually the source.
What each result usually means:
- Wet only when the basin is full: the strainer flange or its gaskets. Retightening the locknut sometimes helps, but resealing or replacing the strainer is the reliable fix.
- Wet at the coupling just under the strainer when draining: the tailpiece washer or coupling nut, a much simpler repair.
- Wet lower down at the curved trap: a slip nut, a worn washer or a cracked trap. Our P-trap guide covers how traps fit together and when to replace one.
- Wet regardless of the sink being used: a supply line, a valve or the faucet, not the drain at all.
For a broader checklist of the usual suspects, including dishwasher connections and supply lines, see our guide to a leak under the kitchen sink. EPA’s WaterSense Fix a Leak Week page recommends checking a home’s water meter before and after a two-hour period when no water is being used; if the meter changes, there is probably a leak. That test catches supply-side leaks, but a drain leak only shows when water is running down the drain, so the fill-and-drain method above is the more useful test for a strainer.
Why small drain leaks matter
A strainer leak may only release a little water each time the sink drains, but it does so many times a day into a dark, enclosed cabinet. Particleboard cabinet floors swell and crumble when they stay wet, and moisture can reach the subfloor. EPA’s guide to mold and moisture says that if wet or damp materials are dried within 24 to 48 hours after a leak, in most cases mold will not grow, and that if mold is cleaned up without fixing the water problem, the mold problem will most likely come back. Fixing the strainer, and drying the cabinet thoroughly, is the cheap version of that lesson.
How to Replace a Kitchen Sink Strainer
Replacing a basket strainer is a common do-it-yourself job, though corroded nuts and tight cabinets can slow things down. The general sequence:
- Clear the cabinet and put a bucket under the drain. A flashlight and something to kneel on help.
- Disconnect the tailpiece. Loosen the coupling nut under the strainer and, if needed, the trap slip nuts so the tailpiece can drop out of the way. Expect some trapped water.
- Remove the locknut. A spud wrench, a large pair of tongue-and-groove pliers or a strainer wrench can turn it. Hold the strainer from above with pliers handles inserted crosswise in the basket body, or a strainer removal tool, so it does not spin. Seized metal nuts sometimes have to be cut, which takes care to avoid damaging the sink.
- Push the old strainer up and out. Scrape off old putty or sealant from the sink with a plastic scraper, then clean the area with a solvent appropriate for the sink material.
- Seal the new flange. Roll a rope of putty and press it under the flange, or apply the manufacturer’s specified sealant or gasket instead.
- Seat and clamp. Press the strainer into the opening, then from below install the rubber gasket, the fiber gasket and the locknut in that order. Tighten firmly but not excessively, keeping the strainer centered. Wipe away the putty that squeezes out inside the sink.
- Reconnect the tailpiece with a new washer if the old one is flattened, and realign the trap.
- Test. Do the fill-and-hold test and then the drain test again, and check every joint with a dry tissue. Check again the next day.
Older homes sometimes have brass drains, galvanized arms or long-forgotten patch jobs below the sink. If loosening the strainer starts twisting pipes that are not supposed to move, stop and call a plumber rather than forcing it.
Basket Stoppers, Mesh Inserts and Disposal Flanges
Basket stoppers versus mesh inserts
The removable part of the strainer comes in a few styles:
- Post-style basket stoppers have a center post that seals the drain when twisted or pushed down, so the basin can be filled for washing dishes.
- Lift-and-turn or push-button stoppers seal with a gasket on the bottom of the basket when pressed or rotated.
- Mesh or perforated inserts are simple catch baskets that do not seal. They are cheap and catch fine debris well, but they cannot hold water in the basin.
Stoppers that stop sealing often only need a new rubber gasket or a replacement basket, not a whole new strainer body. Baskets are not always interchangeable between brands, so bringing the old one to the store or checking the model helps.
Bathroom sinks use an entirely different mechanism, usually a pop-up assembly operated by a lift rod or a push-to-close cap. Those are covered in our sink stopper guide.
Disposal flanges are a different part
A sink with a garbage disposal does not use a basket strainer. Instead, it uses a disposal flange (sink flange) and mounting assembly that clamps to the sink and holds the disposal’s weight. It is also sealed with putty or a gasket, and it can leak in similar ways, but the parts and the repair are different. Converting a sink between a disposal and a basket strainer means swapping these assemblies and reworking the drain below. Our guides on garbage disposal installation and garbage disposal repair cover flange leaks, mounting rings and disposal-specific problems.
Related under-sink connections
Strainers rarely fail alone in an old kitchen. When the sink is being worked on, it is a good time to look at:
- The overall drain layout, including continuous waste fittings on double bowls, covered in our kitchen sink drain guide.
- The dishwasher drain connection, which should have a high loop or an air gap so dirty sink water does not drain back into the dishwasher. See our dishwasher drain hose guide.
- The faucet and supply lines. If the faucet is old or dripping, replacing it at the same time saves a second session under the sink. Our kitchen faucet replacement guide walks through the job. EPA WaterSense notes that old and worn faucet washers and gaskets frequently cause faucet leaks.
Choosing and Maintaining a Strainer
Strainers look alike on the shelf, but they differ in ways that affect how long they last. A few things to compare:
- Body material. Solid stainless steel or heavy brass bodies generally hold up better than thin plated steel or lightweight plastic, which can corrode, crack or strip at the threads.
- Locknut versus retainer. A large threaded locknut is the traditional design. Three-screw retainer styles can be easier to tighten in a cramped cabinet because the screws turn with an ordinary screwdriver.
- Sink thickness. Very thick sinks, such as cast iron and some composite or fireclay models, may need a strainer with a longer threaded body. Check the sink specifications before buying.
- Finish match. Strainers come in finishes meant to match faucets. Finish is cosmetic, but plated finishes over cheap metal can wear through at the rim.
Routine care is simple. Empty the basket regularly rather than letting scraps sit, and clean the basket gasket so the stopper keeps sealing. Many Front Range communities have moderately hard water, and mineral scale can build up on the basket and its seat, which keeps the stopper from sealing and makes the basket stick. Soaking the basket in a vinegar solution and scrubbing with a soft brush usually loosens it. Avoid pouring grease down the drain, since the strainer stops scraps but not fats, which can cling inside the tailpiece and trap. Once or twice a year, a quick look under the sink with a flashlight, checking the strainer nut and the dishwasher connection for dampness, catches small leaks before the cabinet floor does.
What Sink Strainer Work Costs
Prices depend on the strainer quality, the sink and how cooperative the old parts are. These are general 2026 ranges for the Front Range, not quotes:
- Replacement basket only: often roughly $5 to $25.
- Complete basket strainer assembly: commonly about $10 to $40 for basic models, and roughly $40 to $100 or more for heavier stainless or designer finishes.
- Plumber’s putty, gaskets and washers: usually a few dollars each.
- Professional replacement: many plumbers charge a minimum service call, often somewhere in the range of $100 to $250, for a straightforward strainer swap. Seized nuts, corroded tailpieces or trap replacement can add time and parts.
- Water damage repair: if a long-running leak has ruined the cabinet floor or reached the subfloor, repair costs can quickly exceed the plumbing bill by a wide margin, especially if mold cleanup is involved.
What a home inspector looks for
The ASHI Standard of Practice calls for inspectors to inspect interior water supply and distribution systems, including fixtures and faucets, and interior drain, waste and vent systems, including fixtures. In practice that usually means running water at each sink, letting it drain, and looking under the cabinet for active drips, stains, corrosion, improper materials and signs of past leaks. Inspectors may note a loose or corroded strainer, a leaking slip nut, a missing dishwasher high loop or a damaged cabinet floor, and recommend repair by a plumber. The standard also says inspectors are not required to fill shower pans and fixtures to test for leaks, so a strainer that leaks only when the basin is full may not show up during an inspection; the fill-and-hold test above is worth doing after move-in. Our plumbing and water inspection section explains what else falls within scope, and the main guide to hiring a home inspector covers choosing an inspector in the Front Range.
References
- Fix a Leak Week — U.S. Environmental Protection Agency, WaterSense
- A Brief Guide to Mold, Moisture and Your Home — U.S. Environmental Protection Agency
- Standard of Practice — American Society of Home Inspectors
Frequently asked questions
Should plumber's putty or silicone go under a sink strainer?
Plumber's putty is the traditional choice for stainless steel and most enameled sinks. Some stone, quartz and composite sinks can stain from putty, so their makers may specify stain-free putty, silicone or a gasket. Follow the sink and strainer instructions.
How can you tell if the strainer or the trap is leaking?
Dry everything, plug the sink and fill it a few inches. If the underside of the sink gets wet while the water sits, the strainer seal is leaking. If leaks appear only while draining, check the tailpiece coupling, slip nuts and trap.
Can a leaking sink strainer just be tightened?
Sometimes a loose locknut is the only problem, and snugging it stops the drip. If the putty has dried out or the gaskets are cracked, the strainer needs to be removed, cleaned and resealed or replaced.
Does a sink with a garbage disposal have a strainer?
Not a basket strainer. A disposal uses its own sink flange and mounting assembly, which seals and leaks in similar ways but uses different parts and repair steps.
How much does it cost to replace a kitchen sink strainer?
Parts often run roughly $10 to $40 for a basic assembly and more for premium finishes. A plumber's minimum service call commonly falls around $100 to $250. These are general 2026 ranges.
Seeing stains or a soft cabinet floor under a sink in a home you are buying? Get in touch and we will connect you with a Front Range inspector who checks under every sink.