P-Trap: How It Works, Cleaning and Replacement
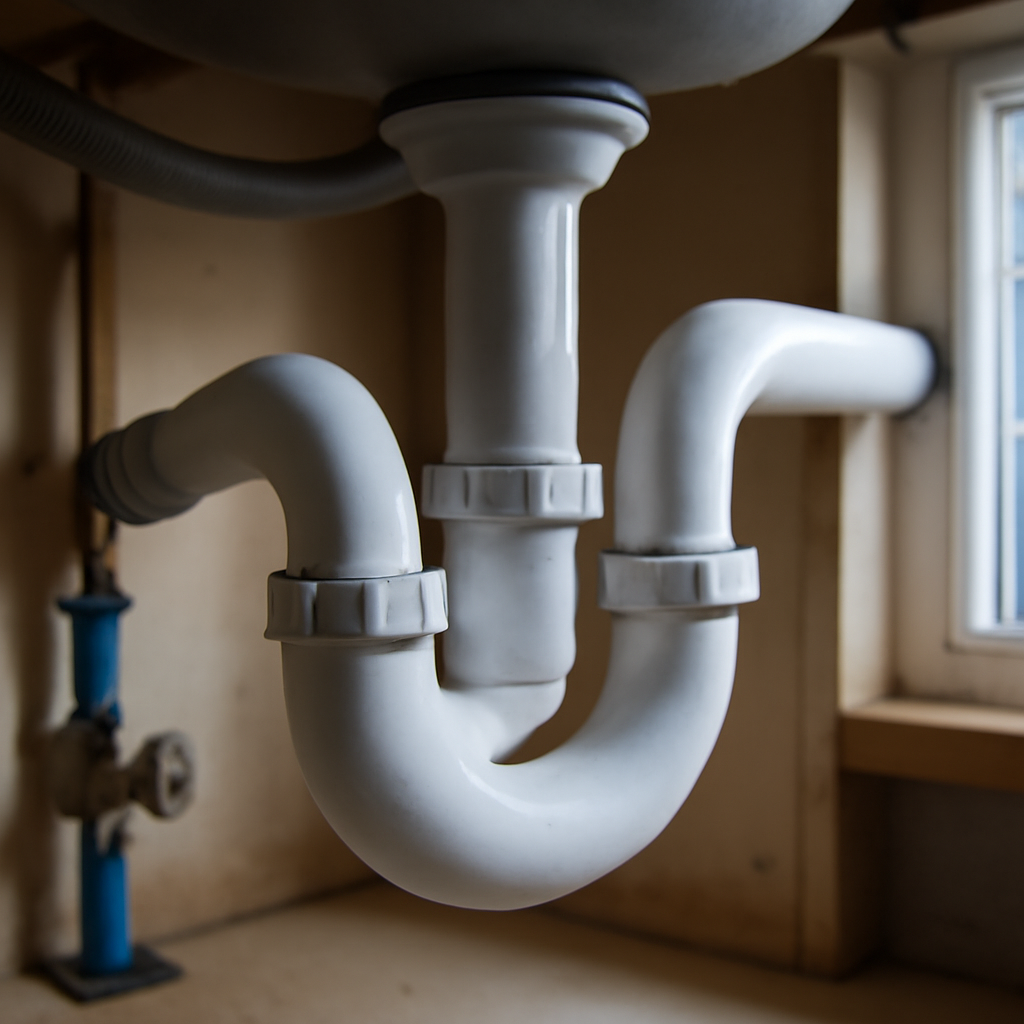
Open the cabinet under almost any bathroom or kitchen sink and you will see a curved section of drainpipe shaped a bit like a sideways letter J or U. That bend is the p trap, and it is one of the simplest and most important parts of a home’s plumbing. It holds a small plug of water that keeps sewer gas out of living spaces, and it also catches rings, hair and debris before they travel deeper into the drain system. When a trap clogs, leaks or dries out, the symptoms range from a slow sink to a puddle in the cabinet to a rotten-egg odor in the room. This guide explains how a trap works, the parts and materials involved, why older S-traps are a concern, how venting fits in, how to clean a clogged trap step by step, why slip joints leak, and when the job belongs to a licensed plumber. Cost figures are general 2026 ranges and vary with region, access and the condition of the surrounding pipes.
Part of our Plumbing & Water guide — start there for the full picture →
What a P-Trap Does
A drain line connects every fixture in a house to the municipal sewer or a septic system. Without some kind of barrier, gases from that system would drift straight up the drain and into the room. The trap solves this with a deliberately designed low spot. After each use, water settles in the curve and fills it, forming what plumbers call a trap seal. Air and gas cannot pass through that water, so the drain stays open for wastewater while staying closed to sewer gas.
Sewer gas is a mix of compounds, and one of the most recognizable is hydrogen sulfide. The Occupational Safety and Health Administration describes hydrogen sulfide, also known as sewer gas, as a colorless gas with a pungent rotten-egg odor at low concentrations, and notes that it occurs naturally in sewers. Household plumbing is very different from a confined sewer space, but an odor in the home is still a sign that something in the system is not sealing as it should. If you are chasing that smell, our guide to sewer smell in the house walks through the broader list of causes, from toilet seals to cracked drain lines.
The trap also has a practical secondary job. Because water slows down as it passes through the bend, heavier objects tend to settle there. A dropped earring often ends up in the trap rather than deep inside a wall.
Parts and Materials of a Sink Trap
A typical sink trap assembly is made of a few pieces joined with slip nuts and washers, so it can be taken apart without tools in many cases:
- Tailpiece. The straight vertical pipe that drops from the sink drain or garbage disposal.
- J-bend (trap bend). The curved section that holds the water seal. This is the part most people mean when they say “the trap.”
- Trap arm. The horizontal section that runs from the J-bend into the wall, where it connects to the drain and vent piping.
- Slip nuts and slip-joint washers. Threaded nuts that compress a beveled washer around the pipe to create a watertight joint.
- Trap adapter. The fitting at the wall that the trap arm slides into.
Common materials include:
PVC
White or off-white plastic, widely used in modern homes. PVC traps are inexpensive, do not corrode and are easy for homeowners to work with.
ABS
Black plastic that serves the same purpose as PVC. Some regions and builders favor ABS. The two plastics are generally not solvent-welded together without a transition fitting or approved cement, so it is worth noting which one your house uses before buying parts.
Chrome-plated brass or steel
Found in older homes and in exposed installations such as pedestal sinks, where appearance matters. Chrome traps look good, but thin-wall versions can corrode from the inside over time, and corroded slip nuts may seize or crack when loosened. Many plumbers replace an old metal trap with plastic rather than trying to reuse it.
P-Traps vs. S-Traps
An S-trap looks like a P-trap with an extra downward bend: instead of the trap arm running horizontally into the wall, the pipe turns and drops straight down through the floor. S-traps were common in older construction, and you may still find them under sinks in homes built many decades ago or in places where someone improvised a repair.
The concern with an S-trap is self-siphoning. When a basin full of water drains, the falling column of water in the downward leg can pull the water out of the trap behind it, leaving the seal partly or completely empty. A trap that siphons dry stops blocking sewer gas, even though the sink appears to drain normally. Gurgling after draining and an intermittent odor are classic clues.
Because of that risk, S-traps are commonly disallowed for new work under the model plumbing codes that many jurisdictions adopt, and inspectors often flag them as a defect. Local rules vary, and some older installations may be allowed to remain unless the fixture is replaced, so check with your building department or a licensed plumber before deciding whether a conversion is required. Converting an S-trap usually means opening the wall to add a properly vented trap arm, which is more involved than a simple trap swap.
How Venting Protects the Trap Seal
A trap only works if it keeps its water. The plumbing vent system is what makes that possible. Vents let air into the drain lines so draining water does not create negative pressure that sucks the trap empty, and they carry sewer gases up and out through the roof. A sink trap arm typically connects to the drain at a fitting that also ties into a vent, either directly behind the wall or through a vent that rises from the drain line nearby.
When a vent is blocked by debris, a bird nest or frost, or was never installed correctly, nearby traps may siphon whenever a large volume of water drains. Symptoms include slow draining, glugging or bubbling noises, and an odor that shows up after another fixture is used. Our guide to the plumbing vent stack explains how the roof vent works and what goes wrong with it.
Trap arm length basics
The distance between the trap and the vent connection matters. If the trap arm is too long or slopes too steeply, the trap is more likely to siphon, and if the slope is too shallow, debris settles in the pipe. Model plumbing codes set maximum trap arm lengths based on pipe diameter, and for common small bathroom drains those limits are generally measured in a handful of feet rather than across a whole room. Exact figures depend on the code edition and local amendments, so a remodel that moves a sink significantly should be reviewed by a plumber or permit reviewer.
How to Clean a Clogged P-Trap Step by Step
A slow bathroom sink is often caused by hair and soap scum caught in the stopper mechanism or the trap. Before reaching for chemical drain cleaners, which can be harsh on skin, eyes and some older pipes, many homeowners find that simply removing and rinsing the trap works well. For a typical plastic trap with slip nuts:
- Clear the cabinet and gather supplies. Remove stored items, then set out a bucket or shallow pan, old towels, rubber gloves, a flashlight and a stiff bottle brush or old toothbrush. Channel-lock pliers can help with stubborn nuts.
- Place the bucket under the J-bend. The trap is full of water and debris by design, so expect a spill when it comes apart.
- Loosen the slip nuts. Turn the nuts on each end of the J-bend counterclockwise (as viewed from the direction the nut moves). Plastic nuts often loosen by hand. If you use pliers, wrap the jaws with tape or a cloth to avoid cracking the plastic.
- Remove the J-bend and drain it. Tip the water into the bucket and pull out the debris. Note the orientation of each washer, because beveled slip-joint washers face a specific direction.
- Clean the trap. Scrub the inside with the brush and rinse it in a utility sink or outside, not in the sink you just disconnected.
- Check the trap arm and tailpiece. Use a flashlight to look into the trap arm toward the wall. If the clog seems to be beyond the trap, a small hand auger fed into the wall drain can reach it.
- Inspect the washers. Replace flattened, cracked or hardened washers. They are inexpensive and are a common reason a reassembled trap drips.
- Reassemble. Slide the nuts and washers into place, align the pipes so they meet squarely, and hand-tighten. Add a gentle extra turn with pliers only if needed; overtightening can distort plastic nuts.
- Test. Run water for a minute, then fill the basin and release it. Watch every joint with a dry paper towel underneath to spot slow drips.
If the trap is clean but the sink still drains slowly, the restriction may be in the pop-up stopper assembly, the branch drain inside the wall or a vent.
Leaks at Slip Joints and Other Trap Problems
Most under-sink trap leaks come from the slip joints rather than the pipe itself. The usual causes are:
- Misalignment. If the tailpiece or trap arm enters the J-bend at an angle, the washer cannot seal evenly. This often happens after a new faucet, vanity or disposal is installed.
- Worn or missing washers. Washers can flatten over time, crack when disturbed, or get lost during cleaning.
- Loose or cracked nuts. Plastic nuts loosen with vibration, especially under kitchen sinks with garbage disposals. Overtightened nuts can split.
- Corroded metal. Older chrome traps can develop pinholes or thin spots that weep slowly.
Even a slow drip deserves attention. Water that collects in the cabinet base can swell particleboard, stain flooring and, if it continues long enough, support mold growth. The U.S. Environmental Protection Agency advises that the key to mold control is moisture control and that wet materials should be dried within 24 to 48 hours of a leak to help prevent mold. A water leak detector placed in the cabinet can alert you to drips you would otherwise miss.
EPA’s WaterSense program also points out that household leaks add up. Its Fix a Leak Week materials state that the average household’s leaks can account for more than 9,300 gallons of water wasted every year, and suggest checking faucet gaskets and pipe fittings for water on the outside of the pipe.
Dry Traps in Unused Drains
A trap does not have to leak or clog to fail. If a fixture goes unused for weeks, the water in its trap gradually evaporates, and once the seal is gone, sewer gas has an open path. This is common in guest bathrooms, vacant homes listed for sale and especially basement floor drains, and dry Front Range winter air can speed the process.
The fix is usually to pour water into the drain. For a sink or tub, running the tap for several seconds refills the trap. For a floor drain, a pitcher or two of water works. Some homeowners add a small amount of mineral oil on top of the water to slow evaporation in drains that sit unused. For drains that dry out repeatedly, a plumber can install a trap primer, which adds water automatically, or a trap seal insert. Our guide to the basement floor drain covers how these lower-level drains are connected and why they are frequent odor sources.
If a refilled trap dries out again within a day or two, evaporation is probably not the only issue. Siphoning from a vent problem or a crack in the trap itself are the next things to rule out.
Replacing a P-Trap
Replacing an under-sink trap is one of the more approachable plumbing tasks. Trap kits are sold by diameter, commonly 1-1/4 inch for bathroom lavatories and 1-1/2 inch for kitchen sinks, so measure the existing pipes first.
Replacement becomes more complicated when the trap arm is glued into the wall fitting, when the existing configuration is an S-trap, when the drain outlet in the wall is too high or too low for the sink, or when old galvanized or cast-iron pipe behind the wall is corroded. Those situations often involve opening the wall or replacing more of the drain, and they are better handled by a licensed plumber who can also confirm that venting is adequate.
When to Call a Plumber
Many trap issues are homeowner-friendly, but call a plumber when:
- A sewer odor persists after you have refilled every trap in the house.
- Multiple fixtures drain slowly or gurgle at the same time, which can indicate a main line or vent problem.
- The sink has an S-trap or no visible trap at all.
- The trap arm connects to corroded metal piping inside the wall.
- A leak has soaked the cabinet floor or the ceiling below, raising questions about hidden damage.
- A remodel moves a fixture and the trap arm length or vent connection may no longer work.
Water that has spread beyond the cabinet, stained a ceiling or saturated a subfloor may need drying and repair in addition to the plumbing fix. A moisture meter can help gauge whether surrounding materials are still damp after the leak is stopped.
Typical P-Trap Repair Costs
Costs vary by region, plumber rates, access and what is found once the cabinet is open. As rough 2026 planning figures:
- DIY trap kit: often in the range of a few dollars to roughly $25 for plastic parts, with chrome or decorative traps costing more.
- Plumber to clear or replace a standard sink trap: frequently somewhere around $150 to $350, depending largely on minimum service-call charges.
- Converting an S-trap or reworking a trap arm and vent inside the wall: can run from several hundred dollars to well over $1,000 when walls must be opened and patched.
Get written quotes and ask whether the price includes drywall or cabinet repair if the wall needs to be opened.
What a Home Inspection Covers
During a standard home inspection, plumbing traps are part of the visual review. The ASHI Standard of Practice directs inspectors to inspect interior drain, waste and vent systems, including fixtures, and to describe drain, waste and vent piping materials. Inspectors commonly run water at sinks and tubs, watch for leaks at slip joints, and may note S-traps, missing traps, corroded metal traps or evidence of past leaks in cabinets. They are not required to inspect the interiors of vent systems that are not readily accessible, and drain lines inside walls are outside the scope of a visual inspection. Buyers who want to understand what an inspector will and will not evaluate can start with our guide to hiring a home inspector.
References
- Hydrogen Sulfide: Overview — Occupational Safety and Health Administration
- Fix a Leak Week — U.S. Environmental Protection Agency, WaterSense
- A Brief Guide to Mold, Moisture and Your Home — U.S. Environmental Protection Agency
- ASHI Standard of Practice for Home Inspections — American Society of Home Inspectors
Frequently asked questions
What is the purpose of a p trap?
A P-trap holds a small amount of water in its curved section. That water seal blocks sewer gas from rising through the drain into the room while still letting wastewater flow out. It also catches debris and small objects before they travel deeper into the drain.
Why does my sink trap smell even though it is not leaking?
The trap may have dried out from lack of use, or it may be siphoning empty because of a blocked or missing vent. Biofilm in the overflow or stopper can also smell. Refill the trap with water first; if the odor returns quickly, have the venting checked.
Are S-traps allowed?
S-traps are commonly disallowed for new work under the model plumbing codes many jurisdictions use because they tend to siphon dry. Rules for existing installations vary, so check with your local building department or a licensed plumber.
How often should a P-trap be cleaned?
There is no fixed schedule. Many homeowners clean a bathroom sink trap only when draining slows. Kitchen traps with heavy grease use may need attention more often. Avoid pouring grease down the drain to reduce clogs.
Can I use chemical drain cleaner on a P-trap?
Chemical drain cleaners can work on some clogs but are caustic and can be hazardous to skin and eyes. Removing and cleaning the trap by hand is often safer and more effective for hair and soap clogs. Follow label directions if you do use a chemical product.
Buying a home with older plumbing or signs of past leaks under the sinks? Reach out to our team and we can connect you with a Front Range home inspector who will look over the visible drains, traps and fixtures before you close.