Sump Pump Installation: Types, Cost and Backup Options
A sump pump is a small machine with a big job. It sits in a pit at the lowest point of a basement or crawl space, collects water from drain tile and the soil under the slab, and pushes it outside before it can rise through the floor. When it works, nobody thinks about it. When it fails during a spring storm or a power outage, the result can be a flooded basement and a costly restoration job. This guide covers sump pump installation from start to finish: choosing between pedestal and submersible pumps, sizing by horsepower and gallons per hour, backup options, check valves, discharge rules, sealed lids for radon, typical costs and the maintenance that keeps a pump ready. It draws on International Code Council model codes, EPA radon guidance and common manufacturer recommendations current as of 2026. Local codes govern the details, so confirm requirements with your building department.
Part of our Crawl Space & Attic Guide guide — start there for the full picture →
What Sump Pump Installation Involves
A complete installation has more parts than the pump itself. A typical system includes a sump basin, usually a plastic liner set into a pit dug through the slab; a pump sized to the expected inflow; a float switch that turns the pump on and off; a check valve that keeps pumped water from falling back into the pit; a discharge line that carries water outside and away from the foundation; and a lid that keeps out debris, moisture and, in many Colorado homes, radon. In basements with interior drain tile, the perforated pipe around the perimeter feeds into the basin.
On a new install, a contractor breaks out a section of slab, excavates a pit deep enough for the basin, sets it on a gravel base, backfills around it, and patches the concrete. The discharge pipe then runs up the wall and out through a rim joist or foundation wall. If the house already has a basin and simply needs a new pump, the job is much smaller: disconnect the old unit, install the new one, replace the check valve if needed and test. Pump replacement is a reasonable project for a handy homeowner; cutting a new pit and running discharge lines usually is not.
Sump pumps are one piece of a broader moisture strategy. Our guide to basement waterproofing methods explains when a pump and drain tile are the right fix, and the crawl space and below-grade moisture hub covers related problems in crawl spaces.
Pedestal vs Submersible Sump Pumps
The first decision is the pump style. Both types move water reliably when sized and installed well; the trade-offs are noise, lifespan, access and pit size.
Pedestal Pumps
A pedestal pump places the motor on a column above the pit, with only the intake at the bottom. Because the motor stays dry, pedestal units are often less expensive and may last a long time. They are easy to service and fit narrow pits that cannot hold a submersible. The downsides are noise, a motor that sticks up out of the floor, and generally lower pumping capacity. The open column also makes an airtight lid harder to achieve.
Submersible Pumps
A submersible pump sits entirely in the basin, with a sealed motor that is cooled by the surrounding water. Submersibles are quieter, can handle more water and solids, and allow a flat, sealed lid over the pit. They tend to cost more and are harder to reach for service, and the sealed motor can eventually fail if seals degrade. For most finished basements and homes that need a sealed lid for radon, submersible pumps are the more common choice.
Switch Types
The switch is a common failure point. Tethered float switches swing up and down on a cord and need a wide pit. Vertical float switches ride on a rod and work in narrower basins. Electronic or diaphragm switches have no moving float to snag. Whatever the type, the switch should move freely without catching on the basin wall, the discharge pipe or the power cord.
Best Sump Pumps: our top 3 picks
| Product | Best for | Key features | Price | Buy |
|---|---|---|---|---|
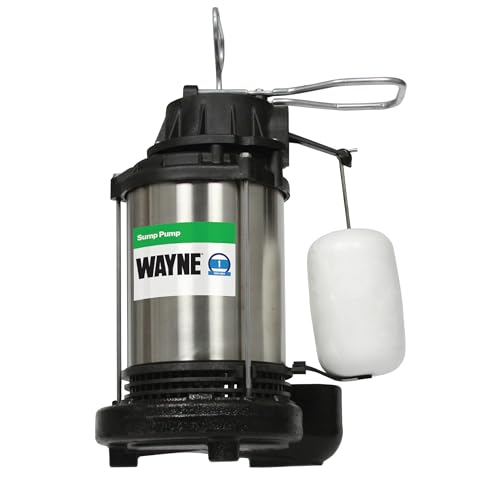
| Wayne CDU800 | Most basements |
| $179.99as of Nov 19, 2026 1:30 am GMT+0000 | Buy now →Check current price |
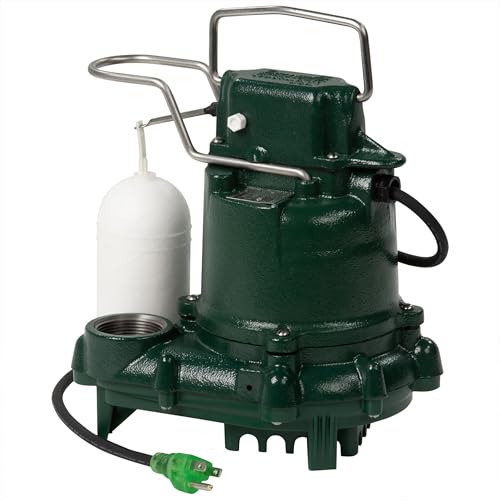
| Zoeller M53 Mighty-mate | Proven 1/3 HP cast iron pump |
| $202.41as of Nov 19, 2026 6:12 pm GMT+0000 | Buy now →Check current price |
| Wayne CDU1000 | Heavy inflow and high water tables |
| $254.00as of Nov 19, 2026 1:30 am GMT+0000 | Buy now →Check current price |

Prices are Amazon’s listed prices as of the time shown and change often; check Amazon for today’s price. As an Amazon Associate we earn from qualifying purchases.
How to Size a Sump Pump
Bigger is not always better. An oversized pump short-cycles, running for a few seconds, shutting off and starting again, which wears out the motor and switch. An undersized pump falls behind in a storm. Sizing considers three factors.
Horsepower
Residential pumps usually range from about 1/4 to 3/4 horsepower, with 1/3 HP and 1/2 HP the most common. A 1/3 HP unit often suits homes with modest water inflow and a short vertical lift. A 1/2 HP unit is a common choice where inflow is heavier or the discharge line has to climb higher. 3/4 HP and larger pumps are typically reserved for high water tables or long, tall discharge runs.
Gallons per Hour and Head Height
Manufacturers publish pump curves showing gallons per hour (GPH) at various heights. Head height is the vertical distance from the pump to the highest point in the discharge line, plus an allowance for friction in long horizontal runs and fittings. A pump rated at several thousand GPH at zero feet of lift may deliver far less at 10 feet. Choose a pump that meets your expected inflow at your actual head height, not at the maximum shown on the box.
Estimating Inflow
For an existing pit, a simple field test helps. During a heavy rain, measure how many inches the water rises in one minute, multiply by the basin’s cross-section to get gallons per minute, then multiply by 60 for gallons per hour. Add a safety margin. A contractor can do this and should also consider the size of the drain tile system feeding the pit.
Backup Options: Battery and Water-Powered
Primary pumps fail most often during the very storms that test them: power goes out, a switch sticks or the motor burns out after hours of constant running. A backup system is often worth the cost in finished basements.
Battery Backup Pumps
A secondary DC pump sits in the same basin, set slightly higher than the main pump, and runs off a deep-cycle or maintenance-free battery when the primary cannot keep up or loses power. A charger keeps the battery topped off, and many units include an alarm. Run time depends on battery capacity and how hard the pump has to work. Batteries typically need replacing every few years.
Water-Powered Backup Pumps
Water-powered backups use municipal water pressure and a venturi effect to draw water out of the pit without electricity. They run as long as city water pressure holds, which makes them attractive for long outages. They use a meaningful amount of city water to move sump water, require an approved backflow preventer under plumbing codes, and are not suitable for homes on wells, since a well pump stops when the power does.
Combination Units and Alarms
Packaged combination systems pair a primary AC pump and a battery backup on one discharge assembly. At minimum, a high-water alarm or a smart sensor that sends a phone alert when the pit fills is an inexpensive layer of protection. Our guide to smart water leak detectors covers connected options. A standby generator is another route, though it should be installed by a licensed electrician with a proper transfer switch.
Check Valves, Discharge Lines and Local Rules
The check valve is a small part that prevents a big inefficiency. Without one, the water left in the discharge pipe falls back into the pit each time the pump shuts off, and the pump has to move it again. Install the check valve above the pump on the vertical discharge, with the arrow pointing in the direction of flow. Many installers drill a small weep or relief hole in the discharge pipe between the pump and check valve, inside the pit, to prevent air lock; follow the pump manufacturer’s instructions on this.
Where the water goes matters as much as how it gets there. Common good practices include:
- Discharge far enough from the foundation that the water does not soak back into the soil and return to the pit. Many installers aim for at least 10 to 20 feet where the lot allows.
- Avoid discharging onto neighboring property, sidewalks or driveways, where water can create ice hazards in winter.
- Protect the line from freezing. Along the Front Range, a frozen discharge line can force water back into the basement. A freeze-protection fitting near where the pipe exits the house lets water escape if the buried section is blocked.
- Never connect a sump pump to the sanitary sewer unless your local code specifically allows it. Many municipalities prohibit it because clean groundwater overloads treatment plants.
Discharge rules are set locally and vary between cities and counties, so ask your building department or the installer which rules apply before you route a new line. Some homeowners connect discharge to a dry well, rain garden or underground drain. Our French drain guide explains how perforated drains can carry water away and where they fit.
Sealed Sump Lids and Radon in Colorado
An open sump pit is a direct connection between the soil under your home and the air in your basement. In much of Colorado, that soil gas carries radon, a radioactive gas the EPA identifies as a leading cause of lung cancer. Most Front Range counties sit in the EPA’s highest-potential radon zone.
A sealed, gasketed lid with airtight grommets around the discharge pipe and power cords keeps soil gas from flowing freely into the basement. It also keeps debris out, lowers humidity and reduces the chance of children or pets reaching into the pit. When a radon mitigation system is installed, the sump basin is often used as a suction point, which requires an airtight seal. A clear viewing port on the lid lets you check the pump without breaking the seal.
Sealing the lid alone is not radon mitigation. The EPA recommends testing and, if levels are elevated, an active soil depressurization system. Our radon sump pump cover guide explains lid styles and installation in more detail.
Common Sump Pump Installation Mistakes
Many sump pump failures trace back to installation choices rather than the pump itself. These are the problems inspectors and contractors see most often:
- A basin that is too small. A narrow, shallow pit fills fast, forcing the pump to cycle constantly and leaving little room for a float to move. An 18-inch-wide, roughly 24- to 30-inch-deep basin is a common residential size.
- No gravel base or filter. A basin set directly on soil lets silt flow in and clog the intake. Washed gravel under and around the basin helps.
- Missing or backwards check valve. Water rushes back into the pit each cycle, shortening pump life.
- Discharge too close to the house. Water dumped beside the foundation simply recirculates into the drain tile.
- Undersized discharge pipe. Reducing the pipe diameter below the pump outlet size restricts flow and lowers real-world capacity.
- Pump on an extension cord or shared circuit. Extension cords overheat, and a tripped shared circuit leaves the pump dead. A dedicated, properly protected outlet is the standard approach.
- An open pit. Besides radon, an uncovered pit adds humidity to the basement and collects debris that can jam the float.
When a pump runs even in dry weather, look for other causes: a high water table, irrigation saturating the soil near the house, a leaking water line, or water from the discharge returning to the pit. Fixing those can be cheaper than a bigger pump.
Sump Pump Installation Costs
Costs depend on whether a pit already exists, the slab thickness, the pump type, the discharge route and local labor rates. Industry estimates suggest these broad 2026 ranges:
- Pump replacement in an existing pit: often a few hundred dollars for the pump plus a few hundred for labor.
- New installation with pit excavation and discharge line: commonly in the low thousands, more with long or buried discharge runs.
- Battery backup system: often several hundred dollars to over a thousand installed, depending on battery capacity and features.
- Water-powered backup: similar range, plus any backflow preventer and plumbing work required.
- Sealed radon-ready lid: commonly under a few hundred dollars for the lid and installation.
- Pump with interior drain tile: a much larger project, typically priced per linear foot of drain.
Ask quotes to list the pump brand and model, horsepower, basin size, check valve type, discharge route and length, any backup system, the lid and the warranty. Comparing those details is more useful than comparing totals.
Maintenance and Testing
Most sump pumps fail from neglect rather than age. A few simple checks keep the system ready.
- Test it every few months and before the spring wet season. Slowly pour a bucket of water into the pit and confirm the float rises, the pump starts, the water drains and the pump shuts off cleanly.
- Clear debris. Silt, gravel and other debris can clog the intake screen or jam the float. Clean the pit at least once a year.
- Check the discharge outlet. Make sure the exterior end is not buried, frozen or crushed, and that water flows freely away from the foundation.
- Confirm the power supply. The pump should be on a dedicated circuit. Check that the outlet works and that any GFCI protection required by your local code has not tripped.
- Maintain the backup. Test battery backup pumps and replace batteries on the manufacturer’s schedule.
- Plan for replacement. Many residential pumps last roughly 7 to 10 years, depending on how often they run. Replacing an aging pump on your own schedule beats replacing it during a storm.
Home inspectors typically observe whether a sump pump is present and operating during a standard inspection and note visible issues like missing check valves, open pits, or discharge lines that empty against the foundation. They do not usually evaluate long-term capacity, so buyers with concerns about water history may want a closer look from a waterproofing contractor.
More Questions About Sump Pump Installation
Can a sump pump be installed in a crawl space?
Yes, sump pumps can be installed in crawl spaces, and they are common where groundwater collects under the house or where crawl space encapsulation includes a drainage system. The pit is usually dug at the lowest point, and the vapor barrier is sealed around the basin.
Access, electrical service and discharge routing can be more challenging than in basements. Crawl space sump pumps should include alarms because they are rarely seen, and owners may not notice a failure until damage occurs.
How long does sump pump installation take?
Replacing a sump pump in an existing pit usually takes one to three hours. Installing a new sump system in a finished basement, including cutting the concrete floor, digging the pit, setting the basin, running the discharge line and patching the floor, often takes one to two days.
Systems that include interior perimeter drain tile can take several days. Electrical work for a new outlet and permits can add time to the schedule.
Does a sump pump need a dedicated circuit?
A sump pump does not always require a dedicated circuit by code, but many electricians and manufacturers recommend one. A dedicated circuit prevents other appliances from tripping the breaker and leaving the pump without power during a storm.
GFCI protection may be required for basement outlets under current codes, though nuisance tripping is a concern for pumps. A monitored alarm or backup pump helps protect against undetected tripping. Local electrical code determines what is required.
Do you need a sump pump if the basement has never flooded?
A home that has never had basement water does not necessarily need a sump pump. Sump pumps are most valuable in homes with high water tables, poor drainage, past seepage, finished basements or locations in low areas.
Signs that a sump pump may help include damp walls, efflorescence, musty odors and water after heavy rain. Improving gutters, downspouts and grading often solves minor issues. Homes with radon mitigation may also use a sump pit as part of the system.
References
- 2024 International Residential Code — International Code Council
- 2024 International Plumbing Code — International Code Council
- Consumer’s Guide to Radon Reduction — U.S. Environmental Protection Agency
- A Brief Guide to Mold, Moisture and Your Home — U.S. Environmental Protection Agency
- ASHI Standard of Practice for Home Inspections — American Society of Home Inspectors
Frequently asked questions
How much does sump pump installation cost?
Replacing a pump in an existing pit often costs a few hundred dollars plus labor. A new install with a pit and discharge line commonly runs into the low thousands. Backup systems, long discharge runs and drain tile add to the total.
Is a pedestal or submersible sump pump better?
Submersible pumps are quieter, move more water and allow a sealed lid, which matters for radon. Pedestal pumps cost less, are easier to service and fit narrow pits. Most finished basements use a submersible.
What size sump pump do I need?
Many homes use a 1/3 or 1/2 horsepower pump. The right size depends on how fast water enters the pit and how high the discharge line climbs. Check the manufacturer's GPH rating at your actual head height.
Do I need a battery backup sump pump?
A backup is worth considering if the basement is finished, power outages are common or the pump runs often. Battery backups work in outages; water-powered backups need city water pressure and are not suitable for homes on wells.
Where should a sump pump discharge?
Water should go far enough from the foundation that it does not soak back into the pit, and not onto neighbors' property or walkways. Many municipalities prohibit connecting to the sanitary sewer. Check local rules before routing the line.
Can a sump pump be installed without breaking the concrete floor?
Interior sump pumps typically require cutting the concrete floor to set the basin. Exterior sump systems or crawl space installations may avoid cutting a basement slab. Contractors control dust with wet cutting and containment when floor work is required.
Does a sump pump installation include drain tile?
Basic sump pump installation does not always include drain tile. A pump in a basin collects water only near the pit unless perimeter drain tile directs water to it. Homes with widespread seepage may need interior drain tile as part of the system.
Can a sump pump be installed in winter?
Sump pumps can be installed in winter, since most work is inside the house. Exterior discharge lines may be harder to route or bury when the ground is frozen, so temporary discharge routing may be used until spring. Proper slope helps prevent freezing.
Buying a home on the Front Range with a sump pit in the basement? Get in touch here to connect with a qualified local inspector who can check the pump, the discharge and the lid before you close.