Shower Waterproofing Membranes: Liquid vs Sheet Systems
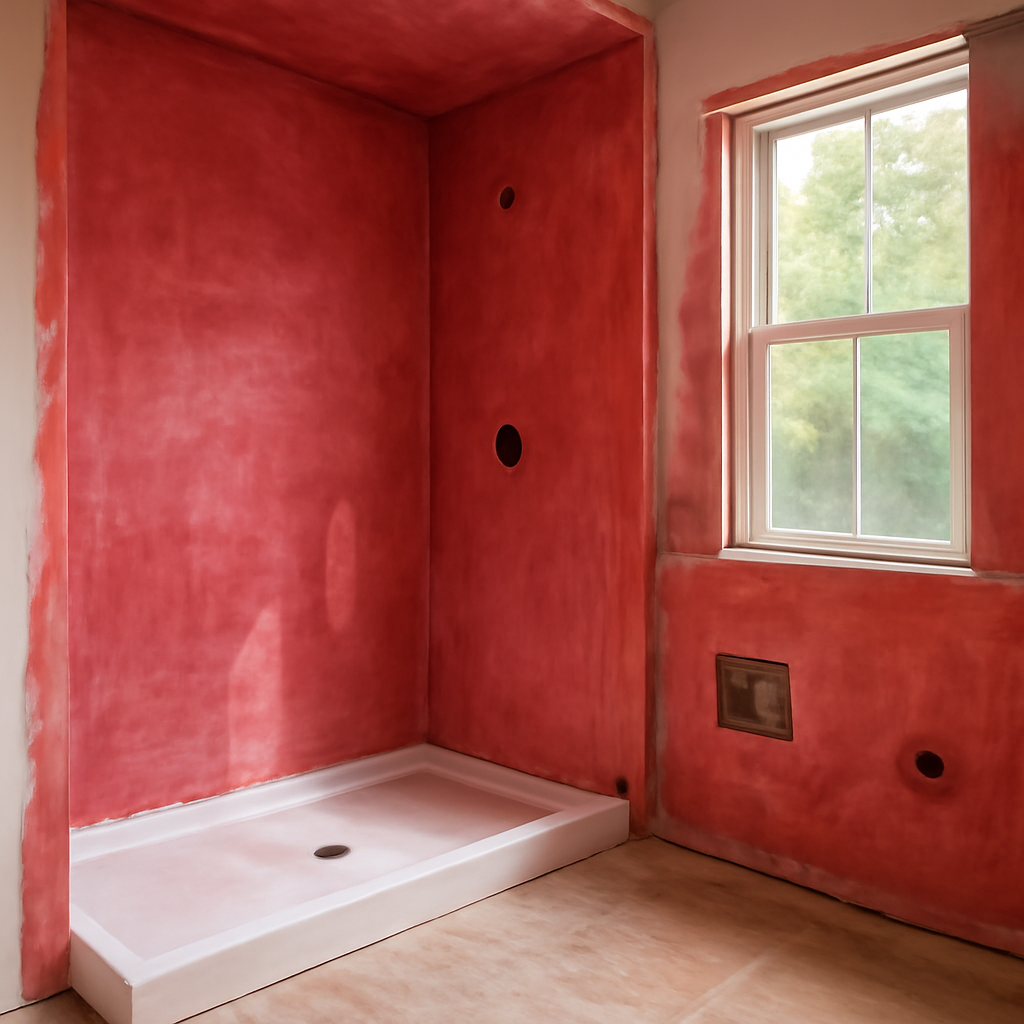
Tile and grout look like a waterproof surface, but they are not. Grout is porous, tile joints crack, and water that soaks through a few square feet of shower wall every day for years has to go somewhere. In a well-built shower, it reaches a waterproofing membrane and drains back to the shower drain. In a poorly built one, it soaks into the wall framing and subfloor, where it can feed rot and mold long before anything shows on the surface. Homeowners researching a remodel often run into product names such as a RedGard waterproof coating, Hydro Ban, or a sheet system such as Kerdi, and wonder how they differ. This guide explains liquid-applied and sheet membranes in neutral terms, why cement board alone is not waterproof, how coverage and thickness are verified, what flood testing involves, how mold develops behind tile, and what to expect on cost. Product names are used as examples only, not endorsements; always follow the specific manufacturer’s instructions.
Part of our Plumbing & Water guide — start there for the full picture →
What a Shower Waterproofing Membrane Does
A shower waterproofing membrane is a continuous layer behind the tile that water cannot pass through. It covers the walls in the wet zone, the floor, the curb, niches and benches, and it connects to the drain so that water reaching the membrane is directed back into the plumbing. The tile, setting mortar and grout sit on top as a finish and a wear surface.
Membranes can be placed in two positions:
- Behind the backer board. In a traditional shower, a sheet of polyethylene or a vapor retarder sits behind the wall board, and a separate liner sits beneath a mortar bed on the floor. Water soaks through the tile and board and is stopped at the back.
- On the surface of the substrate. Modern bonded systems put the membrane directly under the tile, on the face of cement board, foam board or another approved substrate. Water stops just below the tile, so less of the assembly stays wet.
Each approach can work when installed correctly. Problems usually come from mixing methods incorrectly, such as layering a surface membrane over a wall that already has polyethylene behind it, which can trap moisture between two barriers. Manufacturer instructions typically address that combination directly.
Why Cement Board Is Not Waterproof
Cement board is one of the most misunderstood materials in a bathroom. It does not rot, swell or lose strength when wet, which makes it a good tile backer. But it is porous. Water can pass through it, and it can stay damp for a long time. Cement board on its own is water-resistant, not waterproof.
That distinction matters. If cement board is screwed to studs with no membrane behind or on it, water that passes through the grout moves through the board and wets the studs, insulation and drywall on the other side. Over years, that can lead to rot and mold that are invisible until tile loosens or a stain appears in an adjacent room. Foam-core boards and some coated gypsum boards are designed to be part of a waterproof system, but even those typically need seams and fasteners sealed with the manufacturer’s tape or sealant.
Inspectors and remodelers who open old showers frequently find drywall or “green board” in wet zones, cement board with no membrane, or polyethylene that stops short of the tub flange. All of these leave gaps in the water path.
Liquid-Applied vs. Sheet Membranes
Liquid-Applied Membranes
Liquid membranes are rolled or brushed onto the substrate like thick paint. Many are polymer-based and change color as they cure, giving a visual check that the coating is drying. Familiar examples on store shelves include RedGard and Hydro Ban, among others.
Key points about liquid systems:
- Coverage and thickness are the critical variables. Manufacturers specify a minimum dry or wet film thickness and usually require two coats. Some recommend a wet-film gauge to check thickness during application.
- Seams, corners and changes of plane need reinforcement. Most systems call for fabric or mesh tape embedded in the coating at board seams, inside corners, and transitions to the tub or pan.
- Penetrations need attention. Valve bodies, shower arms and niches are common leak points; many manufacturers offer preformed seals.
- Cure time matters. Tiling or flood testing before the membrane has fully cured can compromise it. Temperature and humidity affect cure time.
The appeal is flexibility. A liquid can wrap complex shapes, benches and niches without cutting sheet material. The weakness is that thickness depends on the installer’s care; thin spots, pinholes and missed corners are not always obvious.
Sheet Membranes
Sheet membranes are factory-made sheets, often polyethylene with a fleece facing, bonded to the substrate with thin-set mortar. Kerdi is a widely known example, and several other manufacturers make similar products, often as part of a full system with preformed corners, curbs, drains and niches.
- Consistent thickness. Because the sheet is manufactured, thickness is uniform across the field.
- Seams require overlaps. Each manufacturer specifies a minimum overlap and the bonding material for seams and corners.
- Full bonding is essential. Voids behind the sheet, from insufficient mortar or the wrong type of thin-set, can create weak spots.
- System compatibility. Sheet membranes are often designed to connect to a matching bonding-flange drain, which ties the floor membrane directly to the plumbing.
Which Is Better?
Neither type is universally better. Both are widely used, and both fail when installed poorly. Liquids are often favored for small or complex areas and repairs; sheets are often favored for consistency on large flat surfaces and in curbless designs where the system includes engineered slopes and drains. The most important rule is to use one manufacturer’s complete system as tested and warranted, rather than mixing components.
Shower Floors, Pans and Curbless Designs
The floor is where most shower leaks start, because water sits there longest. Traditional shower floors use a mortar bed over a pan liner that must slope to a clamping drain with weep holes. Modern bonded systems slope the substrate, put the membrane on top, and connect to a bonding-flange drain.
Common floor problems include:
- Liners with no pre-slope beneath them, which lets water pool on the liner and stay there.
- Clogged weep holes in a clamping drain.
- Liners nailed through near the floor, or punctured at the curb.
- Membranes that stop short at the curb or do not wrap the curb fully.
Curbless or zero-threshold showers raise the stakes, because there is no curb to contain water. These designs depend on recessed subfloors, linear or point drains with careful slopes, and membranes that extend beyond the shower area. See our guides to the curbless shower and walk-in shower for layout considerations.
Flood Testing a Shower Before Tile
A flood test is a simple way to prove the floor membrane holds water before tile covers it. The drain is plugged, the pan is filled to a set depth, the water line is marked, and the pan is left for a period, often 24 hours, then checked for a drop in the water line and for leaks below.
Many jurisdictions and manufacturers require or recommend a flood test, but the specifics vary, including the depth of water, the duration and whether an inspector must witness it. Some liquid membranes have a minimum cure time before testing. Check the manufacturer’s instructions and your local building department, and keep photos of the test with the remodel records.
Flood testing an already-tiled shower in a finished home is a different matter. It can reveal leaks, but it can also cause water damage. The American Society of Home Inspectors standard of practice states that inspectors are not required to fill shower pans and fixtures to test for leaks, which is why most home inspections rely on visual clues and moisture readings instead. A specialist leak investigation is the better route when a leak is suspected. Our shower pan leak guide covers the warning signs.
Mold Behind Tile: What Failed Waterproofing Causes
When a membrane fails, the first symptom is often not visible water. EPA’s mold guidance explains that mold will not grow without moisture, that it can grow hidden on the back side of drywall and inside walls around leaking pipes, and that wet materials dried within 24 to 48 hours usually will not grow mold. A slow, daily shower leak does not dry out, which is why mold behind shower walls is common in failed installations.
Signs that waterproofing may have failed include:
- Loose or hollow-sounding tiles, especially low on walls and at the floor.
- Grout that stays dark long after showering, or grout and caulk that crack repeatedly.
- Efflorescence, a white powdery deposit, on grout lines.
- Stains, bubbling paint or soft drywall on the other side of the wall or on the ceiling below.
- A musty odor that persists after cleaning.
EPA advises that homeowners can often clean small areas of mold, generally less than about 10 square feet, but that larger areas or extensive water damage warrant professional guidance, and that the moisture problem must be fixed for cleanup to be considered complete. The CDC notes that mold grows where leaks in roofs, walls or plumbing provide moisture, and recommends fixing those leaks to prevent growth. For a shower, that usually means removing tile and backer in the affected area and rebuilding the waterproofing properly, not just regrouting. A grout sealer can reduce surface staining, but it is not a waterproofing layer.
Common Waterproofing Mistakes
Most failed showers do not fail because the product was bad. They fail at details that are easy to rush. Typical mistakes found during tear-outs include:
- One thin coat of liquid membrane. A single pass, or a coat thinned to stretch the bucket, may leave pinholes and thin spots that cannot be seen once tile goes on.
- No reinforcement at inside corners and board seams. These joints move slightly as the house settles and as temperatures change, and an unreinforced membrane can crack along them.
- Unsealed screw heads and penetrations. Every fastener and pipe through the wall is a hole in the system unless it is covered or sealed.
- Membrane stopping below the showerhead. Water is sprayed well above the head height of many users; the waterproofed area should match the manufacturer’s and local code’s wet-zone requirements, and many installers carry it to the ceiling in steam or tall showers.
- Flat or back-sloped niche shelves. A niche bottom that does not pitch toward the shower lets water sit against the back of the niche.
- Wrong thin-set or adhesive. Sheet systems and some liquid membranes specify which mortars bond properly; the wrong product can leave voids or poor adhesion.
- Caulk used as waterproofing. Caulk at changes of plane is a maintenance joint for the tile surface, not a substitute for the membrane behind it.
Tub Surrounds, Benches and Steam Showers
Tub surrounds take less direct spray than a walk-in shower, but the joint where the wall meets the tub flange is a classic leak point. The membrane or wall barrier should lap over the tub flange so that water runs into the tub, not behind it. Built-in benches and ledges act like small roofs inside the shower; their top surfaces need slope and continuous waterproofing, and their corners need the same reinforcement as wall corners.
Steam showers add a vapor challenge. Hot, pressurized steam can drive moisture into assemblies that would stay dry in an ordinary shower, so manufacturers often call for a specific vapor-rated membrane, a sloped ceiling and full coverage of walls and ceiling. A product that is fine for a standard shower may not be rated for steam use, so check the documentation before choosing.
Questions to Ask a Tile Contractor
- Which membrane system will be used, and will all components come from the same manufacturer?
- How will thickness or coverage be verified, and will photos be provided before tile?
- Will the floor be flood tested, for how long, and will a permit inspector witness it where required?
- What warranty does the system carry, and what installation steps does that warranty depend on?
What Inspectors Look for in Tiled Showers
A standard home inspection is visual and non-invasive. Inspectors typically run the shower, look for cracked or missing grout and caulk, check for loose tiles, examine adjacent walls, ceilings below and cabinets for staining, and may use a moisture meter on surrounding surfaces. They cannot see the membrane itself, so the report focuses on symptoms. Buyers of recently remodeled homes can ask the seller for permits, product information, photos of the membrane before tile, and flood test records. For more on tiled surfaces, see our guides to shower tile and tile installation.
What Shower Waterproofing Costs
Costs depend on shower size, the system chosen, and whether waterproofing is part of a new build or a tear-out repair. The figures below are rough 2026 planning ranges, not quotes.
- Liquid membrane materials for a standard shower: often in the low hundreds of dollars, including fabric reinforcement.
- Sheet membrane system materials: commonly a few hundred dollars or more, rising with preformed curbs, niches, benches and bonding-flange drains.
- Installed waterproofing as part of a remodel: labor varies widely; waterproofing is usually a modest share of the total tile project.
- Tear-out and rebuild after a failed shower: frequently several thousand dollars or more once demolition, framing or subfloor repair, mold cleanup and new tile are included.
Spending a little more on a complete, manufacturer-matched system and a documented flood test is usually far cheaper than rebuilding a leaking shower later.
When to Call a Professional
Call a qualified tile contractor or plumber when tiles are loose, adjacent walls or ceilings show stains, odors persist, or a recent remodel has no record of how it was waterproofed. When mold is extensive, involve a mold remediation professional. If you are buying a home with a newly tiled shower, ask questions before closing. Our home inspector hiring guide and the plumbing and water hiring hub explain how to find an inspector who checks bathrooms and plumbing carefully.
References
- A Brief Guide to Mold, Moisture and Your Home — U.S. Environmental Protection Agency
- Mold Cleanup in Your Home — U.S. Environmental Protection Agency
- About Mold and Your Health — Centers for Disease Control and Prevention
- ASHI Standard of Practice for Home Inspections — American Society of Home Inspectors
Frequently asked questions
Is RedGard waterproof on its own?
Liquid membranes such as RedGard are designed to form a waterproof layer when applied at the manufacturer's specified thickness, with reinforcement at seams and corners and full cure time. Follow that manufacturer's instructions exactly.
Is cement board waterproof?
No. Cement board does not rot or swell, but water passes through it. It needs a waterproofing membrane behind it or on its surface to protect the wall framing.
Should a shower be flood tested?
Many manufacturers and jurisdictions require or recommend flood testing the floor membrane before tile, often for about 24 hours. Requirements vary, so check local rules and the product instructions.
Can you put a liquid membrane over plastic sheeting?
Combining a surface membrane with polyethylene behind the board can trap moisture between two barriers. Most manufacturers address this in their instructions, so check before mixing methods.
How do you know if a shower membrane has failed?
Common signs include loose tiles, grout that stays dark, efflorescence, stains on adjacent walls or ceilings, and musty odors. A leak investigation can confirm the source before tile is removed.
Worried a tiled shower is leaking where you cannot see it? Contact our team and we will help you find a Front Range inspector who checks bathrooms, tile and moisture.