Radon System Installation: What Homeowners Need to Know
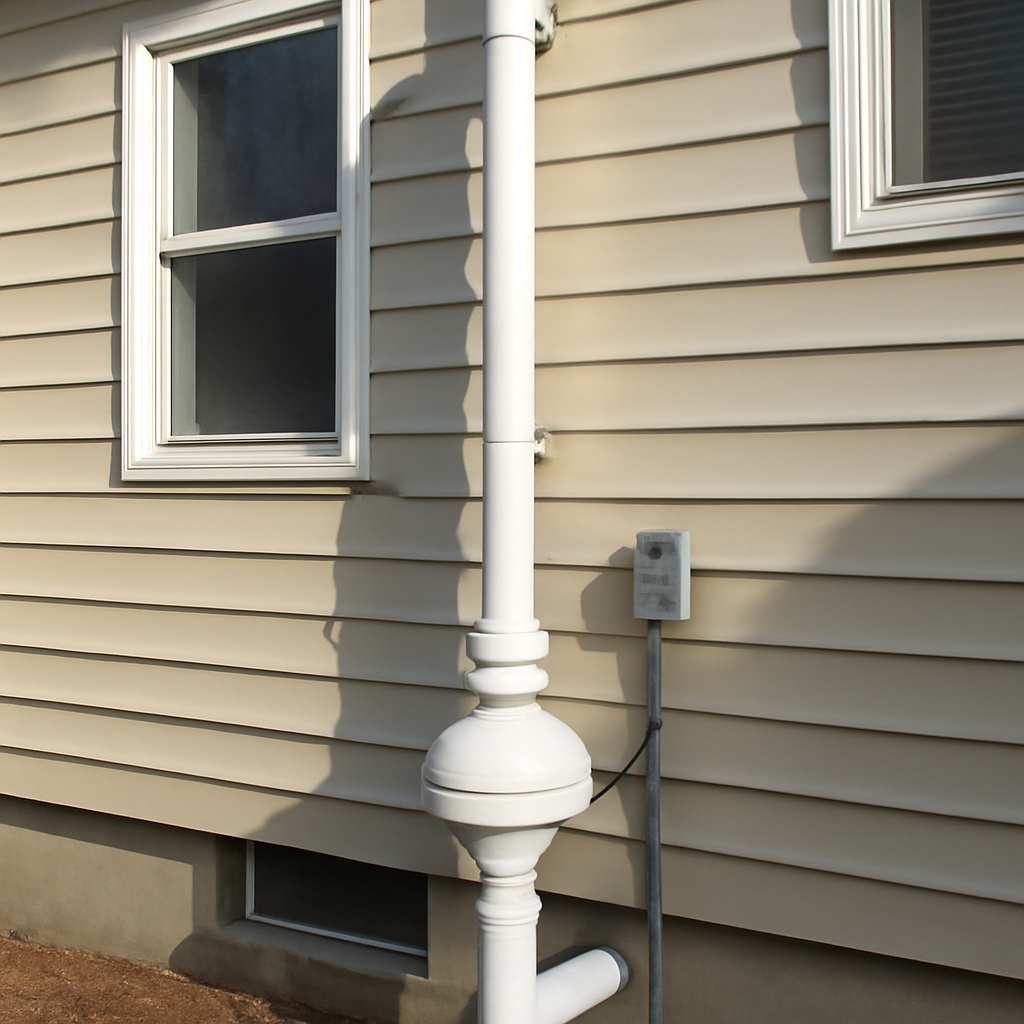
If a test put your home at or above the EPA action level of 4 pCi/L, the fix is a mitigation system that intercepts soil gas and routes it outdoors before it reaches your living space. A radon system installation is a one-day job for most homes, and a properly built system reliably drops indoor radon to a fraction of where it started. This guide summarizes EPA and CDC guidance current as of 2026; it is educational only and not a diagnosis, so rely on a certified radon professional for testing and installation decisions.
What does a radon system installation involve?
The standard approach for a home with a basement or slab is active sub-slab depressurization. An installer cores a hole through the concrete floor, hollows out a suction pit in the soil or gravel beneath, and seals a PVC pipe into the opening. That pipe runs up through the house or along an exterior wall to a discharge point above the roofline. An inline fan creates negative pressure under the slab, so soil gas is pulled into the pipe and vented outside instead of seeping up through cracks.
The job typically takes four to eight hours. By the end you should see the vent pipe, the fan, and a manometer, the small U-shaped gauge that confirms the system is pulling suction. A short-term radon test a day or two later verifies levels have dropped below the action level. The EPA expects a well-designed system to cut indoor radon substantially, often to 2 pCi/L or lower.
Active versus passive systems
Two broad designs exist. An active system uses a fan to actively pull soil gas, and it is the most common retrofit for homes that already test high. A passive system relies on the natural stack effect of warm air rising through the pipe, with no fan, and is usually roughed in during new construction. Passive systems cost less to run but move less gas; many are later converted to active by adding a fan when a test still reads high. The comparison in this guide on the passive radon system approach covers when each makes sense.
For an existing Front Range home with elevated readings, an active sub-slab system is almost always the recommendation. It gives the installer control over suction and a measurable, verifiable result.
How installers design the system for your home
No two foundations are identical, so a good installer does diagnostics before cutting concrete. They check the slab type, look for a gravel layer or other permeable fill beneath it, and may run a pressure-field extension test to see how far suction reaches from a single point. Tight, clay-heavy soils common across parts of Colorado may need a larger fan or more than one suction point to pull radon evenly.
The installer also plans the pipe route and discharge location. The EPA requires the vent to terminate above the roof eave, away from windows and other openings, so discharged gas disperses and does not re-enter the home. Sump pits, crawl spaces, and unsealed foundation cracks all factor into the design, since each is a path soil gas can use. Sealing major openings with the right products complements the active suction; the guide on radon sealing for homeowners explains where sealing helps and where it falls short on its own.
Crawl spaces and tougher layouts
Homes with crawl spaces use a variation called sub-membrane depressurization. The installer lays a heavy plastic membrane across the crawl space floor, seals it to the walls, and draws suction from beneath it. The principle is identical: create negative pressure under a barrier so soil gas is captured before it enters the home. Mixed foundations, with part slab and part crawl space, sometimes need a combined approach.
Why testing must come before installation
Installation is the response to a measurement, not a precaution taken blind. Because radon is invisible and odorless, the only way to know a home needs a system is to test, and the only way to know a system worked is to test again. The EPA frames the whole process as measure, mitigate if the level reaches 4 pCi/L, then verify. Skipping the front-end test risks installing a system a home does not need; skipping the back-end test risks assuming a system works when it does not.
Short-term tests, run from a few days to about a week, give a fast initial read and are common during real-estate transactions when time is tight. Long-term tests, spanning more than ninety days, capture seasonal swings and reflect the true year-round average a household actually breathes. In Colorado the seasonal difference is real: homes sealed and heated through a long winter concentrate radon, so a winter short-term test can read higher than a summer one. A long-term test smooths that out. Either way, a result at or above the action level is the trigger for the installation this guide describes. The broader radon testing guide for Front Range homeowners covers placement, timing, and how to interpret a result.
How much does a radon system installation cost?
The EPA’s general guidance puts most residential radon mitigation in a range running from several hundred dollars on the low end to well over a thousand on the higher end, with the typical job landing somewhere in the middle. The figure depends on foundation type, the number of suction points, pipe routing, and whether the discharge runs through the interior or up an exterior wall. A simple basement with a gravel sub-base sits at the lower end; a finished basement, a crawl space, or a multi-foundation home costs more.
Cheaper is not automatically better. A system that fails to hold radon below 4 pCi/L is no bargain. Look for a contractor certified through a recognized national radon program, get the post-installation test in writing, and confirm the discharge meets EPA placement rules. The broader radon testing guide for Front Range homeowners covers how to confirm you need a system in the first place.
Step by step through installation day
Knowing the sequence removes most of the anxiety homeowners feel about cutting into a foundation. A typical active install moves through a predictable set of stages.
First comes confirmation and diagnostics. The installer reviews your test results, walks the foundation, and identifies the best suction point, often near the center of the slab or close to where soil-gas entry is likely heaviest. Next, they core a hole through the concrete, usually four or five inches across, and excavate a small pit in the soil or gravel beneath. That pit, sometimes called a suction cavity, lets the fan draw from a wider area than the hole alone would allow.
With the pit ready, the installer seals a PVC pipe into the cored opening using polyurethane or a similar sealant, then routes the pipe upward. The path may run through an interior chase, a closet, or the garage, up through the attic and out the roof, or it may climb an exterior wall to a point above the eave. The fan is mounted in an unconditioned space, an attic, garage, or on the exterior pipe, never inside the living area, so that any leak in the pressurized section discharges outside rather than indoors. Finally, the manometer is installed, the electrical connection is made to code, and the system is powered up. The whole sequence usually wraps within a single working day.
Why discharge placement and sealing matter
Two design details separate a system that genuinely protects a home from one that merely looks the part. The first is where the pipe discharges. The EPA requires the vent to terminate above the roof eave, at least a set distance above the roof surface, and away from windows, doors, and other openings. Placed correctly, the discharged gas disperses into open air and dilutes harmlessly. Placed too low or too near a window, it can re-enter the home, undermining the entire system. A reputable installer follows the placement rules without being asked.
The second detail is sealing. While the fan does the heavy lifting, closing major openings in the slab improves how efficiently it works. Sealing the floor-wall joint, large cracks, the sump pit lid, and penetrations around plumbing reduces the conditioned indoor air the fan would otherwise pull under the slab, letting it focus its suction on soil gas. Sealing alone rarely fixes a high reading, but as part of an active system it tightens the pressure field and can lower the fan size needed. The guide on radon sealing for homeowners covers where it helps and where it falls short.
What happens with unusual foundations
Not every home is a tidy open basement. Finished basements require routing the pipe through or around existing walls, which adds time and cost. Homes with multiple foundation types, part slab and part crawl space, may need more than one suction point or a combination of sub-slab and sub-membrane approaches. Slab-on-grade homes without a basement, common in newer Front Range subdivisions, still use sub-slab depressurization but with the suction point and pipe routed to suit the single-level layout. A good installer assesses these wrinkles during diagnostics and prices the system accordingly rather than discovering them mid-job.
What to expect after installation
Once the fan is running, retest within a few days using a short-term kit, then ideally confirm with a long-term test that spans more than ninety days. The long-term reading reflects your true year-round average, which matters in Colorado where homes are sealed and heated for months, concentrating radon indoors during winter.
Maintenance is light. Glance at the manometer periodically; an even liquid level means the fan has stopped and needs attention. The fan itself runs continuously and lasts roughly five to ten years before it needs replacement. Retest every two years per EPA guidance, and again after major foundation or basement work. Colorado’s geology places much of the Front Range, including Denver, Douglas, El Paso, and Boulder counties, in high-radon zones, so an installed system is the most dependable way to keep exposure low over the long run.
Choosing an installer and verifying the work
The quality of an installation rests almost entirely on who does it. Look for a contractor certified through a recognized national radon program, the National Radon Proficiency Program or the National Radon Safety Board, and confirm any state licensing that applies in Colorado. Certification means the installer has been trained to mitigation standards covering suction-point selection, discharge placement, electrical work, and system labeling. Ask for the certification number and verify it is current.
Beyond credentials, ask the practical questions. Will the installer guarantee the system brings your home below 4 pCi/L? Is a post-installation test included in the price, and will you receive it in writing? What fan are they proposing, and why that size for your soil? A confident, specific answer signals experience; vague reassurance is a warning sign. The cheapest bid is rarely the best value, because a system that fails to hold below the action level is the most expensive outcome of all.
Verification is the step that closes the loop. The manometer confirms the fan is pulling suction, but only a radon measurement confirms the air is actually safe. Insist on a follow-up test, and treat the written result as proof the job succeeded. If the reading is still high, a reputable installer will adjust the system, add a suction point, or upsize the fan until it clears, rather than walking away. That accountability is exactly what certification and a written guarantee are meant to provide.
References
- Consumer’s Guide to Radon Reduction — U.S. Environmental Protection Agency
- Health Risk of Radon — U.S. Environmental Protection Agency
- Radon Information for Coloradans — Colorado Department of Public Health and Environment
If a recent test put your Front Range home above the action level, a vetted local installer can design and verify a system sized to your foundation. Reach out through our contact page to get connected.