Pictures of Black Mold: What Homeowners Need to Know
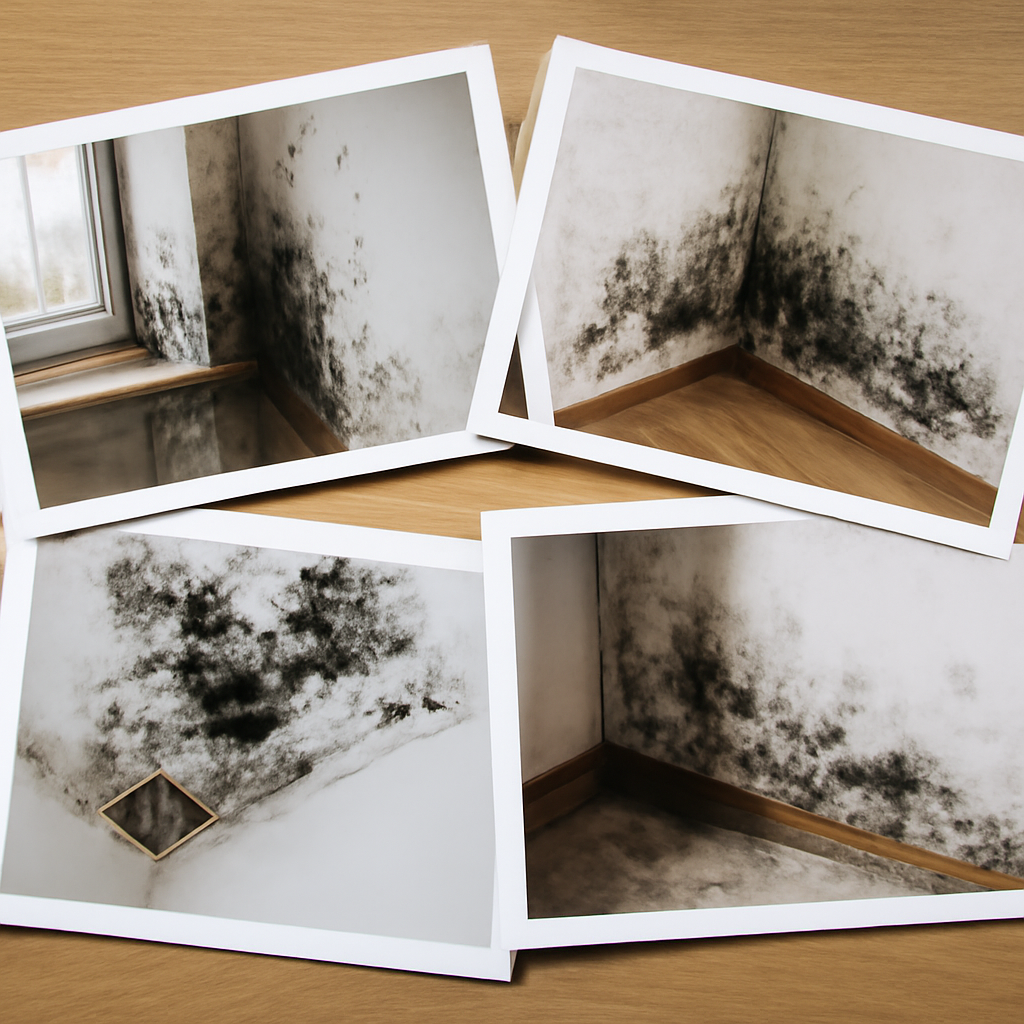
People search for pictures of black mold for a simple reason: they have found something dark and fuzzy in a basement, bathroom, or behind furniture and want to know how worried to be. Photos are useful for recognizing that growth is present, but they have real limits, because many harmless stains and several different fungi all look similar in an image. This guide summarizes EPA and CDC guidance current as of 2026 and is general information, not a diagnosis; persistent symptoms warrant a physician, and significant contamination warrants a certified professional. Knowing what black mold typically looks like, what is often mistaken for it, and why appearance alone cannot tell you the species helps you respond sensibly rather than fearfully.
Is this mold, asbestos, or water damage? Get a free instant screen
Upload a clear photo of the suspect area. You'll get an instant AI screening opinion and what to do next. This is screening guidance, not a professional determination.
Screening guidance only. AI can be wrong. Confirm asbestos, mold type, or lead with lab testing or a licensed professional before acting.
What Does Black Mold Look Like?
What people call black mold spans a range of appearances. The most feared, Stachybotrys chartarum, often appears as dark green to black growth with a slimy or wet sheen when actively growing, fading to a powdery look when it dries. It tends to colonize materials with high cellulose content that have stayed wet, such as drywall paper, ceiling tiles, and wood. Other dark molds, including Cladosporium and Aspergillus species, can also look black, gray, or dark green and are far more common in homes.
In photos, black mold usually shows as irregular patches or spreading clusters rather than a uniform stain, sometimes with a fuzzy or speckled texture and often radiating from a water source like a leak or a corner where condensation collects. A musty odor commonly accompanies it. The crucial point, emphasized by the EPA, is that the color and look of mold do not reliably indicate the species or how hazardous it is. A photo can confirm growth; it cannot confirm what kind. The wider context of identifying and managing household mold lives in the mold inspection and testing hub.
What Is Often Mistaken for Black Mold in Pictures
Many dark marks photographed as suspected mold turn out to be something else. Mildew, an early-stage surface mold, often appears as flat black or gray speckling in damp areas like grout and window frames and is generally easier to clean than deep growth. Soot and dust streaking from candles, fireplaces, or HVAC registers can mimic mold along ceilings and vents. Efflorescence, the white-to-gray mineral crystals that form as water moves through masonry, is sometimes mistaken for mold but is a salt deposit, not a living organism.
Dirt, dried algae on exterior surfaces, and even some manufactured staining can all read as mold in a photo. Because these look-alikes call for different responses, ranging from a simple wipe to ignoring it entirely, a picture is a starting point, not a verdict. When the dark material is at HVAC registers, the guidance on distinguishing growth from debris in the article on black mold in vents is directly relevant, since soot and dust frequently masquerade as mold there.
Can a Photo Tell You If Mold Is Dangerous?
No, and this is the single most important takeaway. The EPA states plainly that you cannot tell whether mold is hazardous by its color or appearance, and that all indoor mold should be cleaned regardless of type. Laboratory analysis of a physical sample, not a photograph, is the only way to identify a species, and even then the EPA notes that sampling is not usually necessary for a homeowner deciding to clean up visible growth.
The health framing matters too. The CDC reports that exposure to mold can cause nasal congestion, throat and eye irritation, coughing, and skin reactions, with stronger effects in people who have allergies, asthma, or weakened immunity, and that these responses are not limited to one species. NIEHS guidance reinforces that there is no universally safe exposure level, so the practical response to any visible indoor mold is the same: remove it and fix the moisture, rather than spending on photo-based identification or species testing that rarely changes what you do.
What to Do When You Find Black Mold
Use the EPA’s roughly 10-square-foot rule as your decision point. For growth smaller than that on hard, non-porous surfaces, homeowners can usually clean it themselves with detergent and water while wearing an N95 respirator, gloves, and eye protection, then drying the surface completely. Bleach is not required for routine mold cleanup, and if used it should never be mixed with ammonia or other cleaners.
Porous materials that are saturated, drywall, carpet, ceiling tile, generally cannot be cleaned and should be removed and replaced. For growth larger than 10 square feet, mold that keeps returning, contamination following sewage or flooding, or any case involving a health-sensitive occupant, call a professional. The walkthrough of professional mold inspection and remediation explains how specialists contain the area, find the moisture source, and verify the result, steps a photo cannot substitute for.
When Documenting With Photos Actually Helps
Photographs do have legitimate uses. Dated photos of growth, water stains, and the suspected source create a record for insurance claims, landlord disputes, or real-estate disclosures. They also help a professional understand the scope before a visit and let you track whether a cleaned area stays clear over time. Use photos to document and communicate, not to diagnose.
How to Prevent Black Mold From Returning
Every reliable prevention measure targets moisture. Keep indoor relative humidity below about 50 percent, using dehumidifiers in basements and exhaust fans in bathrooms and kitchens that vent outside. Repair plumbing, roof, and window leaks promptly, and dry any spill or flood within 24 to 48 hours, the window the CDC and EPA cite for stopping mold before it establishes.
Improve airflow in closed, damp spaces, insulate cool surfaces that sweat with condensation, and address the specific water source behind any growth you have cleaned. If mold reappears in the same place, the moisture problem was never fixed. These steps cost little compared with repeated cleanups or remediation. Homeowners building a maintenance kit can compare options in the roundup of mold cleaning products.
Why Online Mold Photo Galleries Mislead
Search results return thousands of mold photos, and comparing your wall to a gallery feels like a reasonable way to identify what you have. The problem is that photographs strip away the information that actually distinguishes one mold or stain from another. Texture, whether growth is slimy or powdery or fuzzy, depends on how active and how wet the colony is and changes day to day. Scale is rarely clear in a photo, so a one-inch patch and a three-foot patch can look identical on a screen. Lighting and white balance shift the apparent color dramatically, turning gray growth green or black depending on the camera.
Even a perfect photo cannot reveal the one thing people most want to know: whether the mold produces toxins. The EPA is explicit that appearance does not indicate species or hazard, and that determination requires laboratory analysis of a physical sample, not an image. Galleries also tend to feature dramatic worst-case examples, which can either frighten a homeowner whose minor growth looks nothing like them or falsely reassure one whose serious problem happens to look mild. The reliable response to any visible indoor mold is the same regardless of how it photographs: identify the moisture source, remove the growth, and dry the area. For the underlying assessment process that a photo cannot replace, the mold inspection and testing hub describes how professionals actually evaluate growth.
Using Photos the Right Way in a Mold Situation
Photographs are valuable when used for what they do well, documentation and communication, rather than diagnosis. A dated series of photos creates a timeline that supports an insurance claim, a landlord-tenant dispute, or a real-estate disclosure, showing when growth appeared, how far it spread, and what the moisture source looked like. Photos taken before and after cleaning let a homeowner verify that a treated area stays clear over weeks rather than relying on memory.
Photos also help a remote professional understand scope before a visit, so they arrive prepared with the right equipment and containment. To make images useful, include a reference object or ruler for scale, shoot in good even light without flash glare, capture both the growth and the surrounding context such as a nearby leak or window, and record the date. Pair the photos with notes on smell, moisture, and any health symptoms, since those details a camera cannot capture. Used this way, pictures become evidence and a planning aid rather than a flawed substitute for identification. When the documented growth exceeds a homeowner’s scope, the walkthrough of professional mold inspection and remediation outlines the next steps.
Where Black Mold Commonly Appears in Photos
The locations people most often photograph share a common thread: they stay damp. Bathrooms appear constantly, with dark growth in grout lines, along caulk, around the base of toilets, and on ceilings above showers, all places where humidity lingers without ventilation. Basements and crawl spaces show growth on cool walls and floors where warm household air condenses, and on stored cardboard and fabric that absorb ambient moisture. Around windows, condensation on cold glass and frames feeds the speckled growth often photographed on sills.
Behind and beneath appliances, refrigerators, washing machines, dishwashers, slow leaks and condensation create hidden growth that surfaces in photos when furniture is moved. Attics show staining on roof sheathing from roof leaks or inadequate ventilation, though much attic discoloration is harmless and easily confused with active mold. Under sinks, drips feed growth on cabinet floors. Recognizing that these are all moisture-driven locations reinforces the central lesson: the photo documents a damp-area problem, and the response is to find the moisture, not to match the image to a gallery. For attic discoloration specifically, which is frequently misidentified, the comparison in the guide to harmless black mold in the attic helps distinguish a real problem from a cosmetic stain.
From Photo to Action: A Sensible Response
Once a homeowner has photographed suspected mold, a clear sequence keeps the response proportionate. First, gauge the size against the EPA’s roughly 10-square-foot guideline for hard, non-porous surfaces; smaller growth is usually a do-it-yourself cleanup, larger calls for a professional. Second, look for the moisture source near the growth, a leak, condensation, or a humidity problem, because that is what must be corrected for any cleanup to last. Third, assess the material: hard surfaces can be cleaned, while saturated porous materials generally need removal.
For DIY cleanup, wear an N95 respirator, gloves, and eye protection, clean hard surfaces with detergent and water, dry the area completely, and never mix bleach with other cleaners if it is used. For anything beyond the threshold, recurring growth, contamination after sewage or flooding, or a health-sensitive occupant, bring in a professional and use the photos to communicate scope before the visit. The photographs that started the search end up serving documentation and planning rather than diagnosis, which is exactly their proper role. The professional process that a photo cannot replace is detailed in the walkthrough of mold inspection and remediation.
References
- Mold Cleanup in Your Home — U.S. Environmental Protection Agency
- About Mold and Health — Centers for Disease Control and Prevention
- Mold and Your Health — National Institute of Environmental Health Sciences
If you have photographed something you suspect is mold and want a Front Range professional to assess it in person, reach out through our contact page to connect with a vetted local inspector.