Window Flashing: Sill Pans, Tape Sequence and Leak Signs
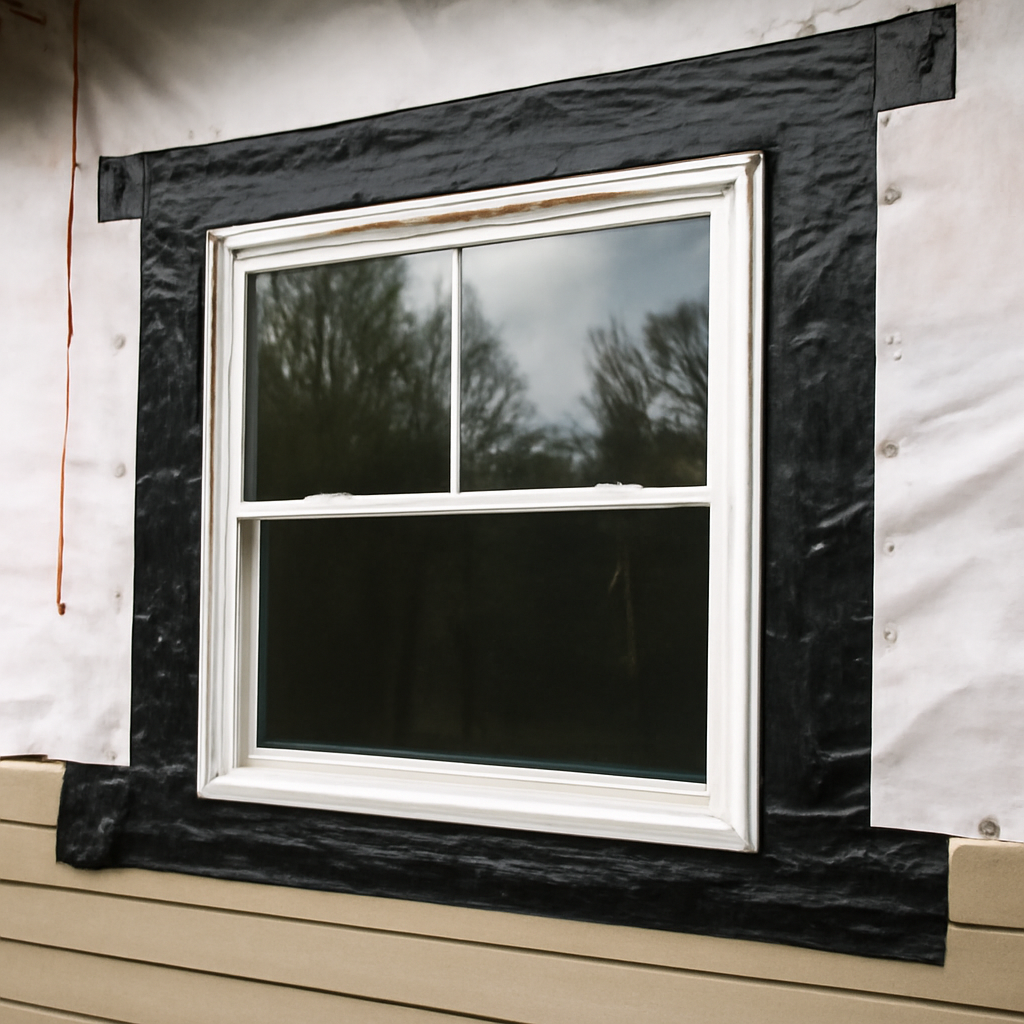
Every window is a hole in a wall that is supposed to shed water. Window flashing is the set of membranes, tapes and metal pieces that turns that hole into a watertight opening by directing any water that gets past the siding back out to the exterior. When it is done right, nobody ever sees it. When it is skipped, reversed or replaced with a bead of caulk, water slips behind the cladding and runs into the sill, the sheathing and the framing below, often for years before stains appear inside. This guide explains the parts of a flashed window, the shingle-lap order that makes it work with house wrap, how new-construction and retrofit windows differ, why sealant is not flashing, how different siding types complicate the job, what leak signs look like, what a home inspector can and cannot see, and what repairs may cost. Cost figures are hedged ranges, not quotes.
Part of our Structure & Exterior guide — start there for the full picture →
What Window Flashing Does
Siding, stucco and stone are not waterproof. Wind-driven rain gets behind every type of cladding to some degree, and water running down a wall concentrates at the top and corners of openings. The weather-resistive barrier (WRB), usually house wrap, building paper or a fluid-applied membrane, is the drainage plane behind the cladding that catches that water and lets it drain down and out. Window flashing connects the window to that drainage plane so water on the WRB above an opening is diverted around the window, and any water that gets into the opening is directed out at the sill instead of into the wall.
A flashed window opening has four parts:
- Sill pan or sill flashing at the bottom of the rough opening.
- Jamb flashing along each side.
- Head flashing across the top, sometimes with a metal drip cap.
- Integration with the WRB, so every layer laps over the one below it.
The EPA’s Moisture Control Guidance for Building Design, Construction and Maintenance treats this kind of detail as central to keeping buildings dry, with chapters on designing, constructing and maintaining walls, roofs and other assemblies to control how water moves into a building. Windows are among the most common places that control breaks down.
The Parts: Sill Pans, Jamb and Head Flashing
Sill Pans
The sill pan is the most important piece and the one most often missing in older homes. Windows leak. Glazing seals age, corner joints in frames open up, and wind can push water through weep systems. A sill pan assumes some water will get into the opening and gives it a path out. It may be a preformed plastic or metal pan, or it may be built with flexible flashing tape folded up the jambs at the corners and up the back of the rough opening to form a dam. Ideally the sill slopes slightly to the exterior, and the front edge of the pan laps over the WRB below so water drains outward.
A common mistake is to seal the bottom flange of the window tight to the sill pan with a continuous bead of sealant. That blocks the drainage path. Many manufacturer instructions call for leaving the bottom flange unsealed or for gaps in the sealant so water in the pan can escape.
Jamb Flashing
Along the sides, flashing tape seals the window’s nailing fin or the frame to the sheathing or WRB. It runs past the bottom of the window and overlaps the sill flashing, then extends above the head so the head flashing can overlap it.
Head Flashing and Drip Caps
At the top, head flashing seals the window’s top fin and then the WRB above is lapped over it. Many installations add a metal drip cap or head flashing above the trim to kick water out past the face of the window. Without it, water running down the wall can get behind the head trim and run into the top of the frame.
The Shingle-Lap Sequence With House Wrap
Flashing works because of the order it is installed in, not just the materials. The principle is the same as roof shingles: every upper layer laps over the lower layer, so water flowing downhill never meets an exposed edge it can run behind.
A typical sequence for a flanged window in a wall wrapped with house wrap looks like this:
- The house wrap is cut at the opening so that a flap remains above the head, with that head flap folded up and temporarily taped out of the way, and the side and bottom flaps folded into the opening.
- The sill pan or sill flashing goes in first, lapping over the house wrap below.
- The window is set and fastened through its nailing fin, with sealant applied as the manufacturer directs, typically along the sides and head but not continuously across the bottom.
- Jamb flashing tape is applied over the side fins.
- Head flashing tape is applied over the top fin, lapping over the jamb flashing.
- The head flap of house wrap is folded back down over the head flashing and its diagonal cuts are taped.
The order matters. A common error is tucking the house wrap behind the top fin before the window is set, or taping the head flashing over the house wrap above. Either way, water running down the wrap gets directed behind the window instead of over it. Our guide to house wrap explains WRB types and laps in more detail, and the same logic shows up wherever a roof meets a wall, as described in our guide to roof flashing.
ENERGY STAR’s installation guidance stresses sticking to manufacturer instructions, noting that certified windows must have installation instructions packaged with the product or readily available online and that some manufacturers will void the warranty if those instructions are not followed. Flashing details are a big part of those instructions.
Nail-Fin Windows vs Block-Frame Retrofits
How a window is flashed depends on how it is installed.
New-Construction (Nail-Fin) Windows
Most new homes and full tear-out replacements use windows with a nailing fin or flange around the frame. The fin is fastened to the sheathing and integrated with the WRB and flashing tapes as described above. This is the most reliable approach because the flashing ties directly into the drainage plane. The trade-off for replacement work is that siding has to come off around the opening.
Block-Frame and Insert Retrofits
Many replacement windows go into existing openings without removing siding. An insert or pocket window fits inside the old frame; a block-frame window replaces the frame but slides into the existing opening without a fin. In both cases, the original flashing, if any, stays where it was, and the new window depends on the old opening’s water management plus sealant and trim at the exterior.
Retrofits can work well when the original opening was flashed properly and is in good condition. When the original opening was never flashed, or the sill is already rotting, a retrofit can hide the problem behind new trim. Good retrofit practice includes checking the old sill for rot, installing a sill pan if possible, and using a backer rod and quality sealant at the exterior with an eye toward drainage. Some contractors recommend a full-frame replacement when leaks or rot are present. For whole-project pricing, our guide to window replacement cost compares insert and full-frame installs.
Sealant Is Not Flashing
Caulk is the most common substitute for flashing and the most common reason windows leak. Sealant has a role: it closes small gaps, reduces air leakage and keeps bulk water off the joint between trim and window. But a bead of caulk cannot drain water that gets behind it, and it is guaranteed to age.
Several things go wrong when sealant is asked to do flashing’s job:
- It cracks and debonds. UV exposure, temperature swings and movement between materials break the bond. On Front Range homes, intense high-altitude sun and freeze-thaw cycles speed this up, especially on south and west walls.
- It traps water. Sealant that closes off the bottom of a window or trim can trap water that does get in, rather than letting it drain.
- It hides the problem. Fresh caulk around a window looks maintained, even when the wall behind it is wet.
Sealant is maintenance; flashing is the system. A window with good flashing and failed caulk is a cosmetic issue. A window with no flashing and fresh caulk is a leak waiting for the right storm. Our guide to exterior window trim covers how trim, drip caps and sealant should work together.
Cladding-Specific Window Flashing Issues
The flashing at the opening has to work with whatever siding is on the wall, and each cladding type brings its own weak points.
Vinyl and Lap Siding
Vinyl siding is installed loosely so it can expand and contract, and it lets a fair amount of water behind it. Windows are typically trimmed with J-channel, and the J-channel at the head should be cut and folded so water drains over the side channels, not into them. Missing head flashing behind J-channel is a classic leak source. Our guide to vinyl siding covers J-channel details and other inspection points.
Stucco
Stucco is rigid and absorbs water, and traditional three-coat stucco relies on building paper behind it to drain. Windows in stucco walls must be flashed and lapped with the paper layers, and a weep screed or similar detail is needed at the bottom of the wall. Leaks at stucco windows often show up as cracks radiating from the corners of openings, staining below the corners, or soft spots when the stucco is pressed. Our guide to stucco repair discusses cracks and moisture problems.
Stone Veneer
Adhered (manufactured) stone veneer has been linked to serious moisture problems when installed without proper drainage and flashing. Window openings are especially vulnerable: water running down the veneer has nowhere to go if there is no drainage gap or head flashing. Our guide to stone veneer explains the drainage and weep details that should be present.
Brick and Masonry
Brick veneer typically has an air space behind it, with metal or membrane flashing and weep holes above window heads where a steel lintel supports the brick. Missing or clogged weeps and rusting lintels are the common defects.
Signs of Window Flashing Failure
Failed window flashing usually shows up somewhere other than the window itself. Watch for:
- Stains below the lower corners of the window, on interior drywall or exterior siding, often in a fan or streak shape.
- Soft, swollen or rotted sills, inside or out. Our guide to window sill replacement covers repairs.
- Peeling paint and swollen trim at the bottom and corners of the window.
- Musty smells or mold on drywall or baseboards beneath windows.
- Stains on ceilings or walls of the room below a leaking upstairs window.
- Bulging, buckling or cracked cladding around openings.
- Water on the sill after storms that did not come from interior condensation.
Not every wet sill is a flashing problem. Condensation from indoor humidity can also wet sills, especially in winter. If the moisture appears on the room side of the glass during cold weather and runs down onto the sill, that is usually condensation. If water appears during or after rain, especially wind-driven rain from one direction, flashing is the more likely culprit.
When a leak is caught late, the hidden damage can include rotted sheathing, rotted framing below the window, and mold in the wall cavity. Our guide to wood rot repair explains how far rot repair typically needs to go. The EPA’s guide to mold and moisture states that the key to mold control is moisture control and that water-damaged areas should be dried within 24 to 48 hours to prevent mold growth, which is rarely possible when water is entering inside a wall. That makes finding and fixing the source the priority.
What a Home Inspector Can and Cannot See
Window flashing is mostly hidden behind siding and trim. The ASHI Standard of Practice requires inspectors to inspect wall coverings, flashing and trim on the exterior, and a representative number of windows on the interior. It does not require them to remove siding or trim, and it specifically excludes engineering analysis. In practice, an inspector can usually see:
- Whether there is a drip cap or head flashing above windows.
- Whether sealant and trim are intact or failing.
- Staining, rot and soft spots at sills and corners, inside and out.
- Cladding details that commonly signal problems, such as missing J-channel kick-outs or stucco cracks radiating from window corners.
- Elevated readings with a moisture meter on interior drywall below windows, if the inspector uses one.
What a standard inspection usually cannot confirm is whether a sill pan exists, whether the flashing was lapped in the right order, or the condition of sheathing and framing behind the cladding. If there are signs of leaks, buyers can ask for a specialist evaluation, which may include infrared imaging, invasive moisture probes or opening a small section of siding. Our guide to hiring a home inspector explains what to expect from a standard inspection and when to add specialists, and the structure and exterior hub gathers related guides.
Window Flashing Repair Costs
Repair costs depend on the cladding, access, number of windows and how much hidden damage is found. The ranges below are rough industry estimates, not quotes.
- Resealing and adding a drip cap to a single window: often roughly $100 to $400.
- Removing siding around one window to reflash it and reinstall: commonly $300 to $1,200 for lap or vinyl siding, more for second-story work.
- Reflashing a window in stucco or stone veneer: frequently $1,000 to $3,000 or more per opening because the cladding must be cut out, patched and refinished.
- Rot repair to sills, sheathing and framing below a leaking window: a few hundred dollars to several thousand depending on the extent.
- Full-frame replacement with new flashing: typically higher than an insert replacement, but it is often the most reliable fix when an opening has leaked for years.
Ask for itemized quotes that describe the flashing method, including whether a sill pan will be installed and how the new flashing will be integrated with the existing WRB.
References
- Moisture Control Guidance for Building Design, Construction and Maintenance — U.S. Environmental Protection Agency
- A Brief Guide to Mold, Moisture and Your Home — U.S. Environmental Protection Agency
- Residential Windows, Doors and Skylights — ENERGY STAR
- ASHI Standard of Practice for Home Inspections — American Society of Home Inspectors
Frequently asked questions
What is window flashing?
Window flashing is the system of membranes, tapes and metal pieces around a window opening that directs water away from the wall. It includes a sill pan at the bottom, flashing on the jambs and head, and integration with the house wrap or other weather-resistive barrier behind the siding.
What order should window flashing be installed in?
Flashing follows a shingle-lap sequence so upper layers overlap lower ones. Typically the sill pan goes in first, then the window, then jamb flashing, then head flashing, and finally the house wrap above is folded down over the head flashing.
Can caulk replace window flashing?
No. Sealant closes gaps and reduces air leakage, but it cannot drain water that gets behind it and it degrades with sun and temperature swings. A properly flashed window needs flashing tied into the weather-resistive barrier, with sealant as maintenance.
How do I know if my window flashing is leaking?
Common signs include stains below the lower corners of a window, soft or rotted sills, peeling paint on trim, musty smells and water on the sill after wind-driven rain. Condensation in cold weather can look similar, so note whether moisture appears after storms.
How much does it cost to fix window flashing?
Rough industry estimates range from a few hundred dollars to reflash one window in lap siding to $1,000 to $3,000 or more per opening in stucco or stone veneer. Hidden rot repair can add significantly to the total.
Seeing stains under window corners in a house you are about to buy? Get in touch with us and we can help you connect with a Front Range inspector who knows where flashing problems tend to hide.