Toilet Flush Valves: Leaks, Seals and Replacement

Most toilet repairs start with the same complaint: the toilet keeps running, refills on its own in the middle of the night, or makes a quiet hiss that never quite stops. The usual suspects are the flapper and the fill valve, but sometimes the problem is the part both of those depend on, the toilet flush valve. It is the large opening at the bottom of the tank that lets water rush into the bowl, and its seat, overflow tube and seal to the tank all have to hold water perfectly between flushes. When the seat is pitted or the gasket underneath it fails, no new flapper will fix the leak, and the repair moves from a five-minute job to one that involves taking the tank off the bowl. This guide explains what the flush valve does, how to tell it apart from the other parts in the tank, how to find silent leaks, what replacement involves, and what homeowners and buyers can expect to pay.
Part of our Plumbing & Water guide — start there for the full picture →
Plumbing problem? Talk to a local plumber now.
📞 Call (877) 637-1527What a Toilet Flush Valve Does
A standard gravity toilet has two main valves inside the tank. The fill valve, usually on the left, refills the tank after a flush and shuts off when the water reaches the set level. The flush valve, in the center, is the outlet that lets stored water drop into the bowl. When the handle is pressed, a chain or lift rod raises the seal off the flush valve’s seat, water flows through the opening and into the bowl, and the seal drops back down once the tank empties.
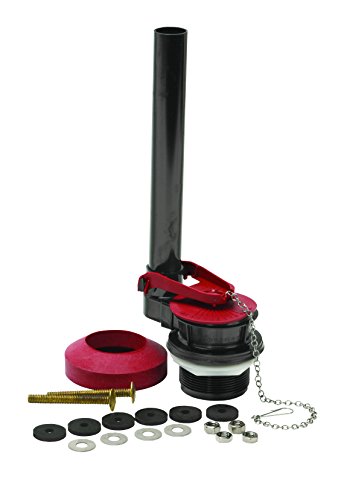
A typical flush valve assembly includes:
- The valve body and seat: a plastic or brass ring with a smooth surface where the flapper or seal sits.
- The overflow tube: the vertical pipe that keeps the tank from overflowing if the fill valve fails to shut off. Water that rises above it drains into the bowl instead of onto the floor.
- The seal: a hinged rubber flapper on most older and many current toilets, or a canister, tower or cylinder seal on some newer designs.
- The tank-to-bowl gasket and locknut: a large rubber gasket and nut beneath the tank that seal the flush valve to the tank and the tank to the bowl.
Flush valves come in different diameters. Older toilets commonly use 2-inch valves, while many newer high-efficiency toilets use 3-inch or larger valves to move water into the bowl faster. A replacement part has to match the size, the overflow tube height and the toilet’s design.
Flush Valve vs Fill Valve vs Flapper
These three parts get mixed up constantly, which leads to buying the wrong part. A quick way to keep them straight:
- Flapper: the rubber seal that sits on the flush valve seat. It is a wear part, and it is the most common source of running toilets. Our toilet flapper guide covers sizing, chain adjustment and replacement.
- Fill valve: the tower on the side of the tank connected to the supply line. It refills the tank and the bowl. A worn fill valve can hiss, refill slowly or let water run into the overflow tube. See our toilet fill valve guide.
- Flush valve: the drain opening, seat and overflow tube that the flapper seals against, plus its gasket to the tank. It rarely wears out on its own, but a damaged seat, cracked overflow tube or failed gasket causes leaks that a new flapper will not cure.
Canister and tower flush valves
Some toilets, including many dual-flush and high-efficiency models, use a canister or tower flush valve instead of a hinged flapper. The whole cylinder lifts straight up during a flush and drops back onto a rubber seal at its base. These designs usually have a replaceable seal that is specific to the brand and model, so the old seal or the toilet’s model number is the best guide to a replacement.
The handle and lift linkage
The handle, lever arm and chain are not part of the flush valve, but they control it. A chain that is too short can hold the flapper slightly open, and one that is too long can tangle under it. Our toilet handle guide covers loose handles and broken lift arms.
Best Toilet Flush Valve: our top 3 picks
| Product | Best for | Key features | Price | Buy |
|---|---|---|---|---|
| Fluidmaster 507AKP7 | 2-inch two-piece tank-to-bowl rebuild |
| $24.51as of Oct 30, 2026 5:19 am GMT+0000 | Buy now →Check current price |
| Danco 12097 | Universal 3-inch upgrade |
| $15.89as of Oct 30, 2026 5:19 am GMT+0000 | Buy now →Check current price |
| Kohler 1069722 | Genuine Kohler canister valve |
| $20.55as of Oct 30, 2026 5:19 am GMT+0000 | Buy now →Check current price |


Prices are Amazon’s listed prices as of the time shown and change often; check Amazon for today’s price. As an Amazon Associate we earn from qualifying purchases.
Symptoms That Point to the Flush Valve
Because the symptoms overlap, diagnosis usually works by elimination. Common signs that the problem involves the flush valve itself include:
- Running water that continues after a new, correctly sized flapper is installed and the chain is adjusted.
- Visible damage to the seat: pitting, mineral buildup, cracks or a rough edge where the flapper rests.
- A cracked or broken overflow tube, which can let water drain continuously into the bowl.
- Water dripping from under the tank, especially near the large center nut, which may point to a failed tank-to-bowl gasket.
- A toilet that “ghost flushes,” refilling for a few seconds at random times because water is slowly escaping from the tank.
If the toilet runs constantly, our toilet keeps running guide walks through a full step-by-step diagnosis, starting with the simplest causes. Checking the water level relative to the top of the overflow tube is one of the first steps: if water is spilling into the tube, the fill valve or its float setting is the more likely problem, not the flush valve.
Colorado water and seat damage
Water hardness varies widely across Colorado depending on the source, and some Front Range and Eastern Plains supplies carry more dissolved minerals than others. Over time, scale can build up on the flush valve seat and on the flapper’s sealing surface, preventing a tight seal. Chlorine and chloramine used in municipal treatment, as well as in-tank cleaning tablets, are also commonly blamed for faster deterioration of rubber seals, and many manufacturers advise against drop-in tank cleaners for that reason. Check the toilet manufacturer’s guidance before using them.
Finding Silent Leaks With a Dye Test
Not every leaking toilet makes noise. Water can trickle past a worn seal into the bowl without a sound, and the fill valve tops up the tank only occasionally, so the leak goes unnoticed for months. EPA’s WaterSense program says an old or worn flapper can cause a toilet to flush on its own or silently leak thousands of gallons a year.
EPA’s Fix a Leak Week guidance describes a simple dye test: put a few drops of food coloring in the toilet tank, and if any color shows up in the bowl after 10 minutes, there is a leak. EPA advises flushing immediately after the test to avoid staining the tank. Dye tablets sold by many utilities and hardware stores work the same way.
Narrowing down the source
A positive dye test means water is getting from the tank to the bowl without a flush. That water is passing either the flapper seal on the flush valve seat or a crack in the overflow tube. A few follow-up checks help separate the two:
- Shut off the supply valve and mark the water level in the tank. If the level drops over 15 to 30 minutes, water is escaping through the flush valve.
- Press down gently on the flapper. If the leak stops, the flapper is not seating, which may be the flapper itself or a damaged seat.
- Run a finger around the seat after draining the tank. Roughness, grit or mineral ridges suggest seat damage.
- Inspect the overflow tube for cracks, especially at the base where it joins the valve body.
Leaks that show up on the floor rather than in the bowl are a different problem. Water under the tank can come from the tank-to-bowl gasket, the tank bolts, the supply line connection or condensation on the outside of the tank in humid weather.
How much water leaks can waste
EPA’s WaterSense program reports that the average household’s leaks can account for more than 9,300 gallons of water wasted every year, and that nine percent of homes have leaks that waste 50 gallons or more per day. It lists worn toilet flappers, dripping faucets and other leaking valves as common types of household leaks, and notes that fixing easily corrected leaks can save homeowners about 10 percent on their water bills. EPA also suggests checking the water meter before and after a two-hour period when no water is being used; if the meter changes at all, there is probably a leak somewhere in the house.
Replacing a Toilet Flush Valve
Replacing a flapper or canister seal is a quick, tool-free job on most toilets. Replacing the flush valve itself is a bigger repair, because the valve is held in the tank by the large locknut underneath and sealed by the tank-to-bowl gasket. On a typical two-piece toilet, that means the tank has to come off the bowl.
The general sequence
The basic steps, described at a high level rather than as a full how-to, usually include:
- Shut off the supply valve, flush to drain the tank and sponge out the remaining water.
- Disconnect the supply line from the fill valve.
- Remove the tank bolts, which may be corroded and need to be cut, and lift the tank off the bowl.
- Remove the locknut and old flush valve, clean the tank opening, and install the new valve with its gasket.
- Install a new tank-to-bowl gasket and new tank bolts with fresh washers, tightening evenly so the porcelain does not crack.
- Reconnect the supply, refill, adjust the water level and check for leaks at every joint.
Because the tank bolts and their washers are disturbed during the job, most plumbers replace them at the same time. Our toilet tank bolts guide explains why overtightening is a common cause of cracked tanks and how leaks at the bolts show up. Some flush valve kits are designed to install without removing the tank by sealing a new seat over the old one with adhesive, which can be a reasonable fix for a pitted seat when the valve body and gasket are otherwise sound.
One-piece, pressure-assist and wall-hung toilets
Not every toilet follows the two-piece pattern. On a one-piece toilet the tank and bowl are a single casting, so the flush valve is usually serviced from inside the tank and parts are often specific to the manufacturer. Pressure-assist toilets use a sealed vessel inside the tank instead of an open flush valve, and their internal cartridges are typically brand-specific; the manufacturer’s parts list is the place to start. Wall-hung toilets with in-wall carriers put the flush mechanism behind an access plate, and repairs depend on the carrier system. In all three cases, identifying the brand and model, often printed inside the tank or under the lid, saves a trip to the store with the wrong part.
When to call a plumber
A handy homeowner can often handle flapper and seat repairs. A plumber is a sensible call when tank bolts are corroded in place, when the tank is heavy or vintage and hard to replace if cracked, when the shutoff valve under the tank will not close fully, or when water has already damaged the floor. A stuck or leaking shutoff valve is common in older homes, and replacing it during the repair can prevent a bigger problem later.
Repair or replace the toilet?
When a flush valve fails on an older toilet, it is worth stepping back. EPA’s WaterSense program says toilets account for nearly 30 percent of an average home’s indoor water use and that older, inefficient toilets can use as much as 6 gallons per flush. WaterSense labeled toilets use 1.28 gallons per flush or less, which EPA describes as 20 percent less than the current federal standard of 1.6 gallons per flush, and they are independently certified for flushing performance. EPA estimates that replacing old, inefficient toilets with WaterSense labeled models can reduce the water a family uses for toilets by 20 to 60 percent. Many Front Range water utilities have offered toilet rebates at various times, so check with the local provider.
A cracked tank or bowl, a toilet that has been repaired repeatedly, or a model whose parts are no longer available all tip the decision toward replacement. A toilet that is otherwise in good condition with a pitted seat is usually worth repairing.
What Flush Valve Repairs Cost
Costs vary by toilet brand, region, access and whether other parts are replaced at the same time. As rough 2026 guidance, not quotes:
- Replacement flapper or canister seal: commonly a few dollars to roughly $25 for the part.
- Flush valve kit: often in a low two-figure range for universal kits, with brand-specific or larger-diameter valves costing more.
- Seat repair kit installed without removing the tank: usually similar to or less than a full flush valve kit.
- Plumber replacing a flush valve with new gasket and bolts: frequently somewhere in the low hundreds of dollars, varying with trip charges and whether additional parts are needed.
- New toilet installed: typically several hundred dollars or more, depending on the fixture and any flange or floor repairs.
Leaks that have soaked the subfloor or the ceiling below can add significantly to the cost, which is one reason to fix running and leaking toilets promptly.
What a home inspector checks
The ASHI Standard of Practice calls for inspecting interior water supply and distribution systems, including fixtures and faucets, and interior drain, waste and vent systems, including fixtures. In practice, inspectors typically flush toilets, watch for running water and refill problems, and check for loose bowls, leaks at the base and signs of past water damage. Inspectors do not normally disassemble tanks, so a slow leak may show up only as a toilet that refills unexpectedly. Our plumbing and water inspections section explains what is covered, and our main guide to hiring a home inspector helps buyers choose an inspector. If the sinks in the same bathroom drip, our faucet cartridge guide is the next stop.
References
- Fix a Leak Week — U.S. Environmental Protection Agency, WaterSense
- Residential Toilets — U.S. Environmental Protection Agency, WaterSense
- Statistics and Facts — U.S. Environmental Protection Agency, WaterSense
- ASHI Standard of Practice for Home Inspection — American Society of Home Inspectors
Frequently asked questions
What is the difference between a flush valve and a fill valve?
The fill valve refills the tank with water after each flush and shuts off at the set level. The flush valve is the large opening at the bottom of the tank, with its seat and overflow tube, that releases water into the bowl when the flapper or seal lifts.
How do I know if my toilet flush valve is bad?
Suspect it if the toilet still leaks into the bowl after a new, correctly sized flapper is installed, if the seat is pitted or cracked, if the overflow tube is damaged, or if water drips from the large nut under the tank.
How do I check for a silent toilet leak?
EPA suggests putting a few drops of food coloring in the tank. If color appears in the bowl after 10 minutes, there is a leak. Flush right after the test to avoid staining the tank.
Do you have to remove the tank to replace a flush valve?
On most two-piece toilets, yes, because the valve is secured by a locknut under the tank and sealed by the tank-to-bowl gasket. Some seat repair kits install over the old seat without removing the tank.
How much does it cost to replace a toilet flush valve?
A flush valve kit often costs in a low two-figure range, while a plumber replacing the valve with new gaskets and bolts frequently charges in the low hundreds of dollars. These are rough 2026 ranges.
Hearing a toilet refill on its own in a house you are about to buy? Contact our team to find a Colorado inspector who runs every fixture and looks for the leaks that do not make noise.