Black Mold in the Toilet Tank: Causes and Cleanup
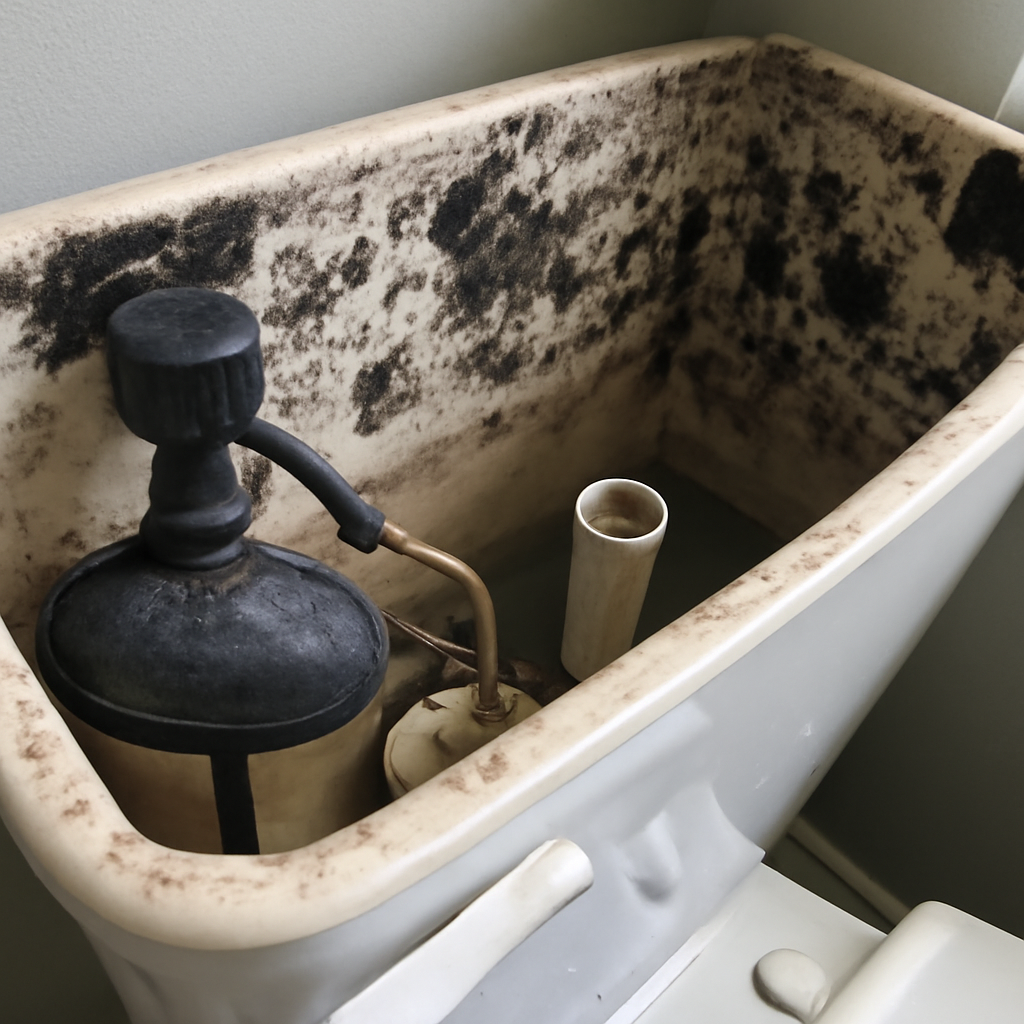
Lifting the lid of a toilet tank and finding dark, slimy patches on the walls and lid underside is a common and slightly alarming discovery. Black mold in a toilet tank thrives because the tank holds still water in the dark for long stretches, the ideal conditions for fungal and bacterial growth. The good news is that it is almost always cosmetic and easy to clean once you understand the cause. This guide summarizes EPA and CDC guidance current as of 2026 and is educational only; consult a physician about symptoms and a certified professional for whole-home moisture concerns.
Part of our Black Mold & Your Health guide — start there for the full picture →
Is this mold, asbestos, or water damage? Get a free instant screen
Upload a clear photo of the suspect area. You'll get an instant AI screening opinion and what to do next. This is screening guidance, not a professional determination.
Screening guidance only. AI can be wrong. Confirm asbestos, mold type, or lead with lab testing or a licensed professional before acting.
Why black mold grows in the toilet tank
The tank is a near-perfect mold habitat. Water sits still between flushes, light is blocked by the lid, and mineral deposits and organic residue collect on the plastic and porcelain surfaces. Together those conditions invite mold along with Serratia marcescens, a bacterium that ranges from pink to black and feeds on mineral and soap residue. The growth typically starts on the lid underside, the waterline, and around the flush and fill mechanisms.
Several factors speed it up. Toilets that are used infrequently, such as in guest baths or basements, let the water stagnate longer. High household humidity keeps the exterior and interior damp. Well water rich in minerals provides extra food, and some in-tank cleaner tablets that contain sugars or dyes can ironically feed growth. A bathroom with poor ventilation compounds everything by keeping surrounding surfaces moist. Our companion guide on black mold in the toilet covers the bowl and rim side of the same problem.
Why the tank is worse than the bowl
Homeowners are often surprised that the tank grows heavier mold than the bowl, but the conditions explain it. The bowl water is refreshed with every flush and exposed to some light when the lid is up, while the tank water sits undisturbed in complete darkness between uses. That stagnation is the single biggest driver: water that does not move gives spores and bacteria uninterrupted time to colonize.
The tank also accumulates a film of minerals and organic residue on its plastic and porcelain surfaces, and that film is food. The fill valve, flapper, and overflow tube are made of rubber and plastic that hold moisture and offer textured surfaces to cling to. Because the lid stays on, the tank traps a small, humid, lightless microclimate that is close to ideal for growth. Add infrequent use, common in guest and basement bathrooms, and the water can sit for weeks. None of this makes the tank dangerous during normal use, since the water is isolated, but it does mean the tank needs cleaning attention the bowl’s self-rinsing action does not require. Our companion guide on black mold in the toilet covers the bowl and rim, which respond to a different cleaning rhythm.
Is black mold in a toilet tank dangerous?
For most healthy people, growth inside a sealed tank poses little direct risk during normal use, because the lid stays on and the water is isolated from contact. The CDC’s general guidance still applies, though: any indoor mold should be removed and the moisture addressed, with the species mattering less than the response. The main exposure happens during cleaning, when scrubbing can stir spores into the air.
People with asthma, mold allergies, or weakened immune systems should wear a mask while cleaning the tank and may prefer to have someone else do it. Recurring heavy growth across the tank and other fixtures can point to elevated bathroom humidity, the same chronic dampness that feeds mold on grout, walls, and window frames. If you are seeing growth beyond the tank, our guide to mold in bathroom walls covers when the issue runs deeper than a fixture. Persistent respiratory symptoms always warrant a physician’s evaluation.
How to clean black mold from a toilet tank step by step
Cleaning the tank is a contained, low-risk task, but mold cleanup still calls for gloves and ventilation. Open a window or run the bathroom fan, and wear rubber gloves and an N95 mask, since tank growth can be heavier than the bowl.
1. Drain the tank
Turn off the water supply valve behind the toilet, then flush and hold the handle to empty as much water from the tank as possible. Sponge out any remaining water so your cleaner is not immediately diluted.
2. Apply a cleaner and let it dwell
Pour about a cup of distilled white vinegar into the tank and onto the walls, lid underside, and components, or use a diluted bleach solution if you prefer. Let it sit for 30 to 60 minutes so it penetrates the growth. Never combine bleach with vinegar, ammonia, or other cleaners, because the fumes are toxic.
3. Scrub all surfaces
Scrub the tank walls, lid underside, and around the fill valve and flapper with a stiff brush or sponge. Avoid harsh abrasives that scratch plastic and porcelain, since scratches harbor future growth. Pay attention to the waterline ring where buildup concentrates.
4. Rinse and restore
Turn the water back on, let the tank refill, and flush several times to rinse the cleaner before normal use. Inspect the rubber flapper and gaskets; vinegar and bleach can degrade rubber over time, so check that they still seal.
When the tank problem points to something bigger
A tank that grows heavy mold again within a week or two, despite correct cleaning, is sending a signal. The usual culprits are a constantly running toilet that keeps everything wet, very high bathroom humidity from missing ventilation, or mineral-rich well water. Fixing a worn flapper or fill valve and adding an exhaust fan often breaks the cycle.
Growth that spreads from the tank to the wall behind it, the floor, or the subfloor is no longer cosmetic. A leaking tank-to-bowl gasket, supply line, or wax ring can soak surrounding materials and feed hidden mold a surface clean cannot reach. In those cases, stop scrubbing and trace the leak, or bring in a professional. For homeowners unsure whether a fixture issue has become a structural one, our mold inspection resources explain when an assessment with moisture metering is worthwhile.
How to keep the toilet tank mold-free
Prevention is mostly about cleaning on a schedule and keeping water from stagnating. Clean the tank every one to two months before growth establishes, and clean rarely used toilets more attentively since their water sits longest. Flush seldom-used fixtures periodically to refresh the water.
Control the bathroom’s overall moisture by running the exhaust fan during and after showers and keeping relative humidity below 60 percent, as the EPA recommends. Fix running or leaking toilets quickly, since constant moisture is the biggest driver. Skip in-tank cleaner tablets that contain dyes or sugars, and consider periodic tank cleaning if you are on well water with heavy mineral content. Front Range homeowners with basement or guest bathrooms that see little use should add those toilets to a regular flush-and-clean routine, because stagnant water is the single most overlooked cause of recurring tank growth. Steady maintenance keeps the tank clean and gives early warning if a leak ever develops.
Protecting the tank components while you clean
A practical concern that gets overlooked is that the chemicals used to fight mold can shorten the life of the rubber and plastic parts inside the tank. Chlorine bleach in particular is hard on the flapper, gaskets, and fill-valve seals; prolonged exposure makes rubber brittle and cracked, which leads to a slow leak that keeps the tank wet and ironically feeds the very growth you were trying to stop. This is why dropping chlorine tablets into the tank is a common cause of premature flapper failure.
Vinegar is the gentler choice for routine cleaning, and even with vinegar it is wise to limit long soaks and to rinse thoroughly by refilling and flushing several times afterward. When scrubbing, use a soft brush or sponge rather than an abrasive pad, because scratches in the plastic and porcelain create rough microhabitats that future growth clings to. After any deep clean, inspect the flapper for warping or stiffness and the fill valve for proper shutoff; a flapper that no longer seals lets water trickle continuously, defeating prevention. Replacing a worn flapper is an inexpensive part-store fix that often resolves both a running toilet and the recurring mold it causes. Keeping the components healthy is as much a part of mold prevention as the cleaning itself.
References
- About Mold and Your Health — Centers for Disease Control and Prevention
- Mold Cleanup in Your Home — U.S. Environmental Protection Agency
- A Brief Guide to Mold, Moisture and Your Home — U.S. Environmental Protection Agency
Frequently asked questions
Why does black mold grow in my toilet tank?
The tank holds still water in the dark, with mineral and organic residue feeding mold and Serratia marcescens bacteria. Infrequent use, high bathroom humidity, mineral-rich well water, and sugary in-tank cleaner tablets all accelerate growth, which usually starts on the lid underside and waterline.
How do I clean black mold out of a toilet tank?
Turn off the supply, flush to drain the tank, then pour in about a cup of vinegar or diluted bleach and let it dwell 30 to 60 minutes. Scrub the walls, lid underside, and components with a brush, avoiding abrasives. Turn the water back on and flush several times to rinse. Wear gloves and a mask.
Is black mold in a toilet tank harmful?
For most healthy people the sealed tank poses little direct risk during normal use. The main exposure is airborne spores during scrubbing, so wear a mask. People with asthma, allergies, or weakened immunity should take extra care, and recurring growth may signal broader bathroom humidity.
How do I stop mold from returning in my toilet tank?
Clean the tank every one to two months, flush rarely used toilets to refresh the water, and fix running or leaking toilets promptly. Keep bathroom humidity below 60 percent with the exhaust fan, skip dyed or sugary tank tablets, and clean periodically if you are on mineral-heavy well water.
If toilet or bathroom mold on the Front Range keeps coming back and you suspect a hidden leak, connect with a vetted local inspector through our contact page for a closer look at the source.
Mold removal & cleanup picks
For a small, contained patch (under ~10 sq ft) these EPA-friendly removers handle surface mold. Larger or recurring growth warrants a professional assessment first.
| Product | Why | Buy |
|---|---|---|
 RMR-86 Instant Mold Stain Remover RMR-86 Instant Mold Stain Remover | Fast-acting on stains; ventilate and wear PPE. | Amazon — $29.99 |
 Concrobium Mold Control Concrobium Mold Control | No-bleach formula that also helps prevent regrowth. | Amazon — $34.27 |
 Mold Armor Mold & Mildew Remover Mold Armor Mold & Mildew Remover | Widely stocked bathroom/surface remover. | Amazon — $22.98 |