What Does Lead Paint Look Like on Walls?
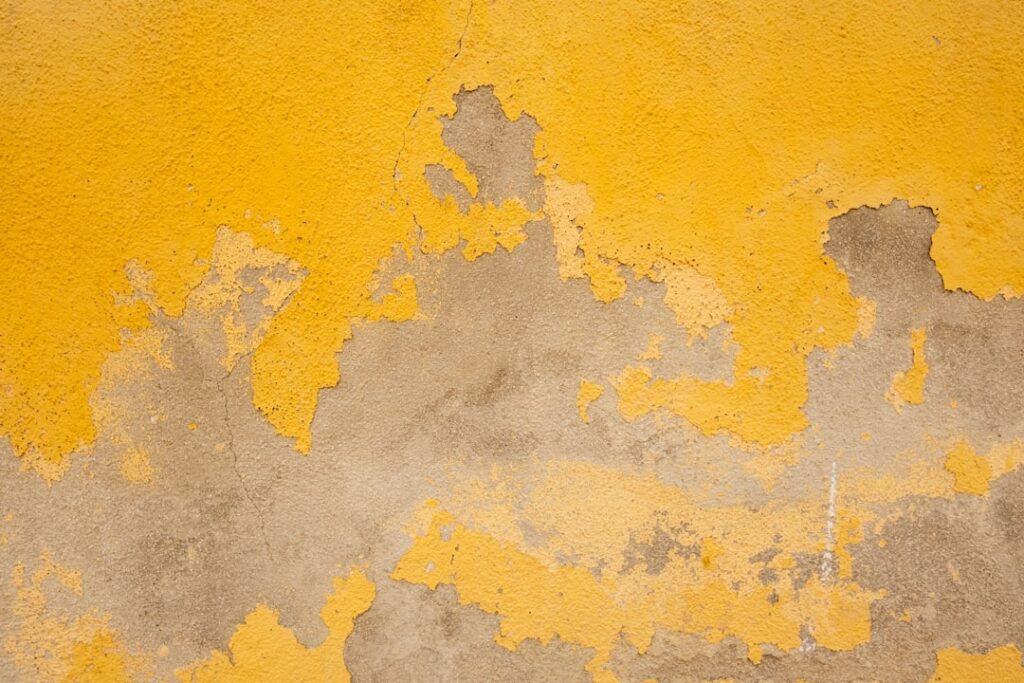
Walls in an older home can carry decades of paint, and somewhere in those layers may sit lead. Asking what does lead paint look like on walls is a sensible first move, because certain aging patterns hint at it. The honest caveat comes first, though: visual cues raise or lower suspicion but never confirm lead, which only testing can do. This guide summarizes EPA and CDC guidance current as of 2026 and is not medical advice. It describes the appearance of deteriorating lead paint and explains why your eyes are a screening tool, not a verdict.
Is this mold, asbestos, or water damage? Get a free instant screen
Upload a clear photo of the suspect area. You'll get an instant AI screening opinion and what to do next. This is screening guidance, not a professional determination.
Screening guidance only. AI can be wrong. Confirm asbestos, mold type, or lead with lab testing or a licensed professional before acting.
What Does Lead Paint Look Like on Walls
The most recognizable sign on walls is a cracking pattern called alligatoring, where the paint splits into small, interconnected segments that resemble reptile skin or dried mud. As lead paint ages and the layers lose flexibility, the surface fractures into this distinctive web. It is most visible on older painted walls that have not been recently recoated.
The second common sign is chalking, a fine powdery film on the surface that comes off on a finger or cloth. Chalking happens as the binder in the paint degrades and releases pigment as dust. On walls, you might notice a dull, faded look with that powdery residue, particularly in rooms with sun exposure or moisture. Neither sign is proof, but together they flag a wall worth testing, as the overview of lead paint warning signs explains.
Other Visual Clues on Painted Walls
Beyond alligatoring and chalking, deteriorating lead paint can peel in thick, brittle flakes rather than thin curls, because old oil-based lead paints were dense and rigid. You may also see a series of distinct paint layers exposed where the wall has chipped, with the oldest layer at the bottom potentially being the lead-containing one. In homes with many repaints, that buried original layer is the usual lead suspect.
Lead paint was often glossy and hard when applied, prized for its durability on trim and high-traffic walls. Where newer flat paint has been rolled over an old glossy coat, you might notice the new layer adhering poorly, peeling away in sheets, because flexible modern paint does not bond well to a rigid old surface. That adhesion failure is another indirect hint worth a test.
Where on the Wall to Look
Inspect the spots that take the most wear and weather. Areas near windows, around door frames, behind furniture in humid rooms, and along baseboards tend to show deterioration first. Walls in bathrooms and kitchens, where moisture is higher, may chalk or peel sooner. Damaged spots where the paint has already chipped let you see the layer stack, which is the most informative place to eventually take a test sample.
The Age of the Home Outweighs Appearance
Appearance is a weaker clue than construction date. The U.S. banned lead in residential paint in 1978, so walls in a pre-1978 home are far more likely to contain it, regardless of how the surface currently looks. A smooth, freshly painted wall in a 1940s home can hide several lead layers, while a heavily cracked wall in a 1990s home almost certainly contains none.
This is why professionals lead with the question “when was the home built?” before examining the paint. The older the home, the higher both the probability of lead and the lead concentration in the original coatings. EPA’s framework treats pre-1978 housing as presumed lead-containing until tested, and that presumption matters more than any single visual sign. The guide on how to identify lead paint walks through combining age and location clues.
Why Visual Inspection Is Not Conclusive
Here is the limit that every visual guide must stress: lead is invisible, and the signs above describe how some lead paint ages, not whether lead is present. Modern non-lead paints alligator and chalk as they age too, so the patterns are not unique to lead. Conversely, lead paint can look flawless, especially when sealed under newer coats. Reading the wall narrows the odds; it cannot settle the question.
The stakes make guessing risky. The CDC notes there is no known safe blood lead level in children, and lead dust from deteriorating paint is the main exposure route. Because exposure and renovation decisions depend on whether lead is actually there, a visual judgment is the wrong basis for action. Visual screening points you toward testing; it never replaces it.
Intact Versus Deteriorating Paint
Condition changes the risk even when lead is confirmed. Lead paint that is intact, sealed under sound newer layers, and not flaking is generally lower-risk because it is not shedding particles. The hazard rises sharply when the paint deteriorates, since peeling, chipping, and chalking generate lead dust that settles on floors and surfaces. A wall showing alligatoring and chalking is therefore a double signal: possibly lead, and possibly actively releasing it.
Confirming and Managing Lead on Walls
To confirm lead, move from looking to testing. A rhodizonate swab kit offers a quick screen, lab paint-chip analysis gives a quantified result, and XRF by a certified inspector reads lead through the layers non-destructively. For walls where the result will guide renovation or affect a household with young children, the more definitive lab or XRF methods are warranted over a swab alone.
Until testing confirms otherwise, treat suspect walls in a pre-1978 home as lead-containing. Avoid dry sanding or scraping, keep deteriorating paint stabilized, and clean with wet methods to control dust. Renovation that disturbs lead paint is regulated, and EPA’s RRP rule requires certified, lead-safe practices for paid renovators on pre-1978 housing. Actual abatement is professional work performed under EPA standards.
When to Call a Professional
Bring in an EPA-certified lead inspector or risk assessor when walls in a pre-1978 home show deterioration, when you plan to sand or demolish painted surfaces, or when young children or a pregnant household member raise the exposure stakes. A professional combines XRF and lab testing with a condition assessment, producing a clear report on where lead exists and what shape it is in. That document, not the wall’s appearance, is what should drive any safe management or abatement plan, as the broader pre-1978 hazard guide describes.
Colors and Finishes That Hint at Age
Beyond cracking and chalking, the look and feel of the original finish can hint at lead. Old lead paints were frequently high-gloss and notably hard, applied to walls and trim where durability mattered. Where you can see the deepest layer in a chipped spot, an unusually glossy, thick, or hard bottom coat is a clue worth testing. The color of that old layer is sometimes distinctive too, since certain historical pigments and the dense application of early paints produce a different appearance from modern flat latex.
None of these finish characteristics confirms lead, because manufacturers varied and modern paints can also be glossy. They simply add to the stack of circumstantial evidence that, combined with the home’s age and the surface’s location, tells you whether a wall deserves a test. Reading a wall is about assembling these small signals into a reasonable suspicion, never about reaching a conclusion from appearance alone, a point the guide to telling if it is lead paint reinforces with testing methods.
Layered Paint and the Buried-Lead Problem
The single biggest reason appearance fails as a test is layering. A wall in an older home may carry five or more coats applied across decades, with the original lead layer sealed at the very bottom and several non-lead coats on top. From the surface, that wall looks like any other freshly painted wall, smooth and modern, giving no hint of the lead beneath. This is why a pristine wall in a 1940s home cannot be assumed lead-free, and why surface inspection so often misleads.
Layering also shapes how lead becomes a hazard. As long as the upper coats stay intact and bonded, the buried lead is contained and lower-risk. The danger appears when the layer stack is breached, by impact damage, water intrusion that lifts the coats, or renovation that sands or scrapes through them. Disturbing a wall that hides lead releases dust from that buried layer, which is precisely why pre-renovation testing matters even on walls that look perfect.
Walls Versus Friction Surfaces
Not all painted surfaces in a room carry equal risk. Flat wall surfaces that no one rubs against generate little dust even when they contain lead, so intact painted walls are generally lower-priority than friction and impact surfaces. Windows that slide, doors that close against frames, and stair railings that hands grip produce far more lead dust through everyday use. When evaluating a room, weight these moving surfaces more heavily than the broad wall fields, both for testing priority and for understanding where exposure actually comes from.
Living Safely With Lead Paint on Walls
Confirmed lead on intact, stable walls does not always require removal. EPA and HUD guidance supports managing sound lead paint in place through interim controls: keeping the paint in good condition, promptly addressing any chipping, cleaning regularly with wet methods to control dust, and avoiding actions that disturb the surface. Repainting over stable lead paint with a fresh, well-adhered coating helps keep the lead contained, provided the surface is properly prepared without aggressive sanding.
The picture changes when walls are deteriorating, when a renovation will breach the paint, or when young children live in the home. In those cases, more definitive measures, from component replacement to professional abatement, become appropriate, and the choice should follow a risk assessment rather than guesswork. Throughout, the principle holds that disturbing lead paint without controls is the worst option, since dry sanding or scraping turns a contained hazard into airborne dust. Wet cleaning, careful maintenance, and professional guidance are the safe path for managing lead that has been found on walls.
How Lead Dust From Walls Spreads
Understanding how lead travels from a wall to a child explains why appearance can be so misleading. When painted walls deteriorate or are disturbed, microscopic lead particles settle as dust on floors, windowsills, and horizontal surfaces, where it is invisible to the eye. From there it gets onto hands and toys, and for young children whose normal behavior includes frequent hand-to-mouth contact, that dust becomes the primary route of ingestion. A wall that looks merely a little worn can be quietly shedding lead into the household environment.
This is why the condition of a wall, not just whether it contains lead, drives the level of concern. Renovation dramatically accelerates the process, since sanding or scraping a lead wall can release in minutes the quantity of dust that natural deterioration would shed over years. Controlling dust through wet cleaning, prompt repair of chipping areas, and lead-safe work practices during any renovation is the core of managing lead on walls. EPA and CDC guidance both center on dust control for exactly this reason, treating the invisible dust as the real hazard rather than the visible paint alone.
Testing a Wall Step by Step
When a wall warrants testing, the method follows the stakes. For a quick personal check, a rhodizonate swab applied to a cut through all the paint layers gives an immediate color-change indication, useful as a screen but limited, since it can miss a buried lead layer and a negative is not a clearance. For a quantified answer on a specific wall, a lab paint-chip sample that captures every coat down to the substrate is more reliable, returning a precise lead concentration after a few days.
For a whole home or before a renovation, professional XRF testing reads lead through the wall’s paint layers without removing anything and covers many surfaces quickly, which is why it anchors formal lead inspections. Matching the method to the consequence is the practical rule: a swab for idle curiosity, lab analysis for a key surface, and certified XRF whenever the result will guide renovation, a purchase, or the protection of a child. The companion guide to identifying lead paint details how to combine these methods with the age and location clues.
References
- Identifying and managing lead in the home — U.S. Environmental Protection Agency
- Lead exposure prevention guidance — Centers for Disease Control and Prevention
- Lead-based paint in older housing — U.S. Department of Housing and Urban Development
If you are buying or renovating an older Front Range home, contact us to be matched with a certified local inspector who can test walls for lead before any work starts.
Lead paint test kits
Instant swab kits flag lead on painted surfaces in minutes — useful before a renovation in any pre-1978 home.
| Product | Why | Buy |
|---|---|---|
 3M LeadCheck Swabs 3M LeadCheck Swabs | EPA-recognized instant swabs. | Amazon — $205.00 |
 Lead Test Kit (lab-based) Lead Test Kit (lab-based) | Mail-in for a documented result. | Amazon — $19.99 |