Joist Tape: Protecting Deck Framing From Water Damage
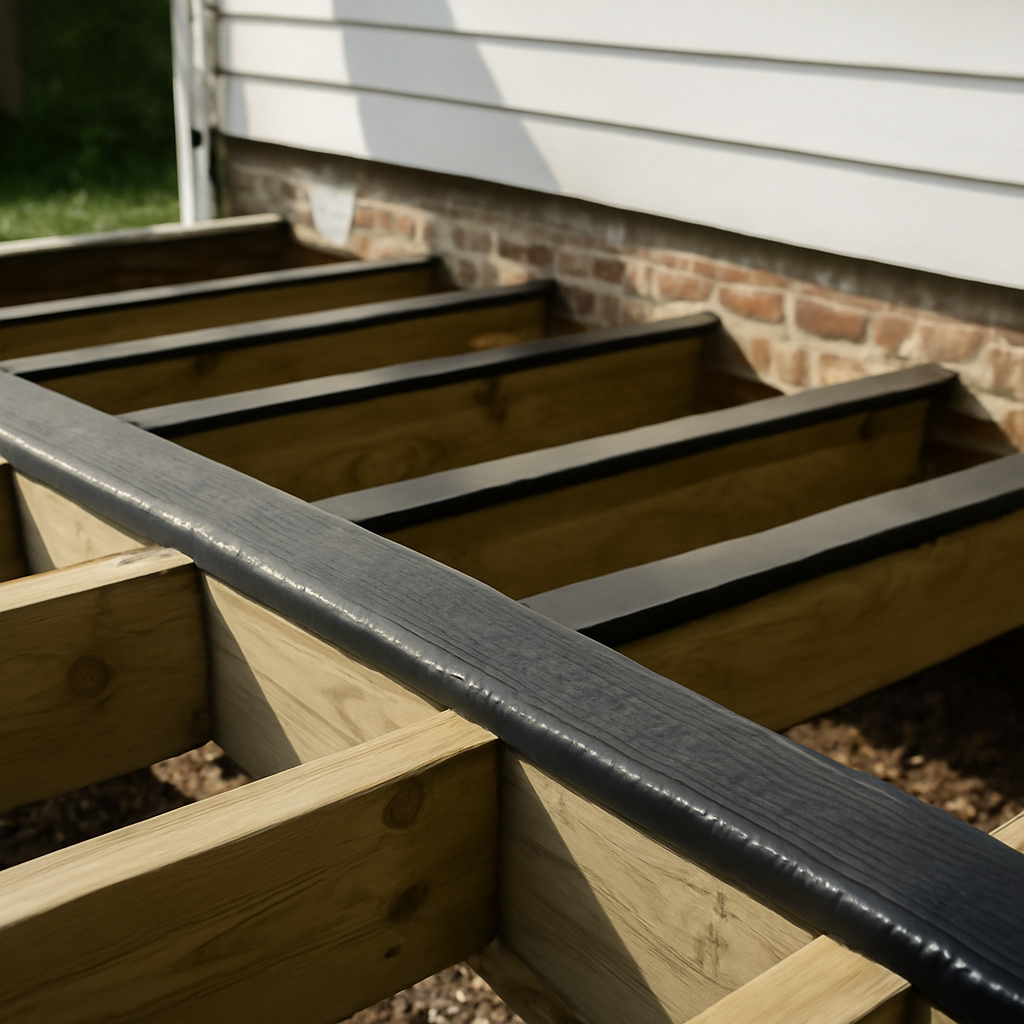
Pull up the boards on an older wood deck and the tops of the joists often tell the story. Dark streaks run along each screw line, the wood is soft where two boards butt together, and the framing has quietly absorbed years of rain and snowmelt. Joist tape is a thin, self-adhering membrane, usually butyl or bitumen based, that builders apply to the top edges of joists, beams and rim boards before the decking goes down. It is cheap relative to the framing it covers, and it has become a routine part of many re-decking jobs. This guide covers what joist tape actually does, what it cannot do, how it is typically applied, and what a home inspector looks at when evaluating deck framing on the Front Range.
Part of our Structure & Exterior guide — start there for the full picture →
What Joist Tape Does
Water gets into deck framing at predictable places. Every fastener driven through a deck board into a joist punches a small hole into the top of that joist. Every seam where two boards butt together sits directly over framing. Water that runs off the boards collects in those spots, soaks into the end grain and fastener holes, and stays there because the tops of joists dry slowly under the boards above them.
Joist tape puts a waterproof layer between the decking and the framing. It does three main jobs:
- Sheds water off the top of the joist, so runoff from the boards drips down the sides rather than pooling on the framing.
- Self-seals around fasteners. Butyl and bitumen membranes are soft enough to grip a screw shank as it passes through, which limits how much water can follow the fastener into the wood.
- Protects seams and butt joints, where two boards meet over a doubled joist or a block and water has the most direct path into the framing.
Pressure-treated lumber is designed to resist fungal decay, but treatment is not a guarantee against rot. EPA’s overview of wood preservatives notes that these chemicals control degradation from fungal rot, decay, molds and wood-destroying insects. Treatment penetration varies, cut ends and drilled holes can expose less-protected wood, and framing that stays damp for long periods can still decay. Joist tape is one way to reduce how often and how long the vulnerable top surfaces stay wet.
Butyl Versus Bitumen Tape
The two common membrane types behave a little differently:
- Butyl-based tapes tend to stay flexible across a wide temperature range, adhere well to wood and usually self-seal well around fasteners. They often cost more per roll.
- Bitumen or asphalt-based tapes are often less expensive and widely available. Some can soften in high heat or stiffen in cold, and manufacturers typically specify narrower application temperature windows.
Product formulations vary, so the manufacturer’s data sheet is the authority on temperature limits, compatibility with treated lumber and expected service life.
What Joist Tape Cannot Do
Tape is a preventive layer, not a repair. Several common misconceptions lead owners and even some contractors to expect too much from it.
It does not fix rot. Taping over soft, decayed wood traps whatever moisture is already inside and hides the damage from the next person who looks. Rotted framing needs to be evaluated, cut out, reinforced or replaced before new tape and boards go on. Our guide on wood rot repair covers how damaged framing is typically assessed and addressed.
It does not replace ledger flashing. The single most important water-management detail on an attached deck is where the deck ledger board connects to the house. That joint needs proper deck flashing that directs water away from the house rim joist and sheathing. Some builders use membrane products as part of a ledger flashing detail, and wider flashing tape has its own role around openings and transitions, but a strip of joist tape on top of the ledger is not a substitute for a properly lapped flashing system.
It does not protect the sides or bottoms of framing. Joist tape covers the top edge. Water that wicks into end grain at beam ends, post tops or ledger connections still needs to be managed by drainage, airflow and good detailing.
It does not fix poor ventilation. Low decks with little airflow underneath can stay damp for long stretches. Tape helps the top surfaces, but the rest of the framing still depends on air movement and clearance from grade to dry out.
EPA’s guidance on mold and moisture makes a broader point that applies here: moisture control is the key to mold control, and water-damaged materials should be dried promptly. Wood decay fungi follow the same basic rule: framing that stays dry is far less likely to rot. Joist tape is a moisture-control tool for one specific surface, and it works best as part of a deck that is designed to drain and dry.
How Joist Tape Is Applied
Application is straightforward, but the details matter. Exact steps vary by product, so these are general practices to compare against the manufacturer’s instructions.
- Inspect and repair framing first. Probe joist tops, especially near seams and old fastener lines. Replace or sister any soft or cracked members before taping.
- Make sure the wood is clean and dry. Tape adheres poorly to wet, dusty or freshly treated lumber that is still saturated. Brush off debris and old fastener residue.
- Check the temperature. Most membranes list a minimum application temperature, and some list a maximum. Cold mornings in Colorado can fall below the range for some products; manufacturers may also call for a primer in certain conditions.
- Cut tape slightly wider than the joist. Many installers choose a width that overhangs each side of the joist a little, so water drips off rather than running back under the edge. Some products are designed to be folded down the sides.
- Roll or press firmly. Pressing the membrane down with a roller helps it bond fully and removes air pockets.
- Lap seams in the direction of water flow. Where two pieces meet, overlapping the upper piece onto the lower one, shingle-style, keeps water from being directed underneath the seam.
- Pay extra attention at doubled joists, blocking and beams, where butt joints and multiple fasteners concentrate water.
Some installers also tape the top of deck blocking where board ends land, and the tops of beams on multi-level designs. The goal is to cover every horizontal wood surface that sits directly under a seam or a line of fasteners.
Common Installation Mistakes
Most joist tape problems trace back to a handful of shortcuts. Knowing them helps owners ask better questions when reviewing a contractor’s work, and helps buyers interpret what they see from beneath a deck.
- Taping wet lumber. Freshly delivered treated lumber can be saturated. Sealing the top of a wet joist can slow drying, and the adhesive may not bond well, leading to tape that lifts or wrinkles over time.
- Reverse laps. When an upper piece of tape is tucked under a lower piece rather than lapped over it, water running along the joist is funneled into the seam instead of over it.
- Tape that stops short. Leaving the last few inches of a joist end bare at the rim or ledger leaves exposed one of the places water collects most.
- Wrinkles and bridging. Tape that is not pressed down firmly can form channels or air pockets where water travels and sits.
- Covering flashing details incorrectly. Where tape meets ledger flashing, the layers need to shed water outward and downward. A strip of tape that directs water behind the flashing defeats the purpose of both.
- Skipping the probe. Taping over a joist that already has soft spots is the most consequential mistake, because it hides a structural issue under a fresh surface.
None of these errors are visible once the boards are installed, which is why photos taken during construction are worth requesting from a contractor and worth asking a seller about during a purchase.
Re-Decking Is the Natural Time to Tape
Joist tape can only go on when the framing tops are exposed. For existing decks, that means the best opportunity comes during deck board replacement. Owners switching to composite decking often keep the original wood frame, and composite boards can outlast that framing by years if the joists are left unprotected. Taping during the swap is one way to help the frame keep pace with the new surface. Fastener choice matters too; our guide to deck screws covers corrosion-resistant options suited to treated lumber.
Colorado Conditions: Freeze-Thaw and UV
Front Range decks face a particular mix of stresses. Snow can sit on a deck surface for days, then melt in strong afternoon sun, then refreeze overnight. Water that gets into fastener holes or checks in the wood can expand as it freezes, which may gradually open cracks and loosen fasteners. Over many cycles, the tops of joists can see more moisture exposure than the climate’s low annual rainfall might suggest.
High-altitude sun adds another factor. Ultraviolet exposure breaks down wood surfaces and many sealants and membranes. Joist tape is generally intended to sit under decking, out of direct sun. Where gaps between boards are wide or where tape overhangs are left exposed, some products may degrade faster. Manufacturer UV-exposure limits are worth checking if a project will leave framing uncovered for weeks before boards go on.
These conditions are reasons tape is popular locally, not proof that it will double a deck’s life. Long-term performance depends on the framing lumber, the original construction, drainage beneath the deck and how well the tape was installed.
What Inspectors Look For Under the Boards
The ASHI Standard of Practice directs inspectors to inspect attached and adjacent decks, balconies, stoops, steps and porches, along with their railings. In practice, a home inspector evaluates the visible and accessible parts of the deck structure, usually from underneath when there is room to get there. Our deck inspection guide covers that process in more detail.
Joist tape itself is rarely the focus of the report. Inspectors generally cannot see it without removing boards, and its presence or absence is not a defect on its own. What they look at is the condition and connection of the framing it is meant to protect.
| Component | What inspectors check | Related guide |
|---|---|---|
| Joists | Rot at tops and ends, cracks, sagging, overspanning, notching | Deck joists |
| Joist hangers | Missing or improper fasteners, corrosion, hangers not fully seated | Joist hangers |
| Ledger board | Attachment method, flashing, rot at the house connection | Ledger board guide (linked above) |
| Repaired framing | Sistered members properly fastened and bearing | Sistering joists |
| Blocking | Present where needed, not decayed, properly fastened | Blocking guide (linked above) |
| Beams and posts | Rot at bearing points and post bases, proper connections | Deck inspection guide (linked above) |
Probing for Rot
Many inspectors carry an awl or screwdriver to probe suspect wood. Sound wood resists the tip. Decayed wood lets it sink in easily, often with little resistance and a crumbly or stringy texture. The most common spots for decay are joist tops near fastener lines and seams, joist ends at the ledger and rim, post tops where water collects and anywhere framing touches soil or debris.
When an inspector finds soft framing, the report usually recommends evaluation by a qualified deck contractor or structural professional. Decks carry people, sometimes many at once, and connection failures can be sudden. Rot at the ledger connection or at joist hangers deserves prompt attention rather than a cosmetic fix.
Signs Taping Was Done Over Problems
Occasionally inspectors find newer decking laid over older framing that was taped without being repaired first. Clues include new boards on old, weathered joists, tape visible at the joist edges from below, and soft spots or sagging between joists that suggest the frame underneath is compromised. A deck that looks new from above may still need framing work. Buyers can learn how inspectors approach decks, siding and other outside elements in the structure and exterior section of our hiring guide.
Costs: Rough Planning Ranges
Joist tape is one of the less expensive parts of a deck project, but costs vary with width, brand, deck size and complexity. These ranges are rough and should be confirmed with current local pricing.
- Materials: a roll typically covers several dozen linear feet, and many small-to-medium decks need only a few rolls. Material cost for a typical deck often lands somewhere from under a hundred to a few hundred dollars, depending on product and footprint.
- Labor during re-decking: because the boards are already off, many contractors add taping for a modest labor charge. Expect it to be a small fraction of the overall re-decking cost.
- Framing repairs found during the job: this is where budgets move. Replacing or sistering a few joists may add hundreds of dollars; widespread rot, ledger repair or reflashing can add substantially more.
When comparing quotes, ask whether the contractor will probe and repair the framing before taping, what width and product they plan to use, how they handle seams and beams and whether ledger flashing is included or priced separately.
Is Joist Tape Worth It?
For a new deck or a re-decking project, many builders consider joist tape a low-cost way to give the framing an extra margin against water. It is most valuable where seams and fastener lines concentrate water, where decks are exposed to repeated snow and melt and where owners plan to install long-lasting decking over wood framing.
It is less useful as a fix for an aging deck with existing decay, and it is no replacement for sound framing, proper hangers, correct ledger attachment and well-detailed flashing. For buyers, the presence of joist tape on a deck is a modest positive. The condition of the joists, hangers, ledger and posts is what actually determines whether the deck is in good shape. For an overview of how deck and exterior findings fit into the broader inspection process, see our main guide to hiring a home inspector.
References
- ASHI Standard of Practice for Home Inspections — American Society of Home Inspectors
- Overview of Wood Preservative Chemicals — U.S. Environmental Protection Agency
- A Brief Guide to Mold, Moisture and Your Home — U.S. Environmental Protection Agency
Frequently asked questions
Does joist tape really prevent rot?
It reduces how much water reaches the tops of joists at fastener holes and seams, which are common starting points for decay. It does not stop rot that already exists and does not protect the sides, ends or connections of framing.
Can joist tape be applied to an existing deck?
Only where the joist tops are exposed, which usually means removing the deck boards. Most owners add it during board replacement, after the framing has been probed and any soft wood repaired or replaced.
Should joist tape be wider than the joist?
Many installers choose a width that overhangs the joist slightly so water drips off the sides rather than running under the tape. Follow the manufacturer's guidance for width, overlaps and folding.
Does a home inspector check joist tape?
Usually not directly, since it sits under the deck boards. Inspectors focus on the visible framing, hangers, ledger, posts and railings, and they probe for rot where they can reach.
Is joist tape needed under composite decking?
It is not always required, but composite boards can outlast an unprotected wood frame. Many builders recommend taping the framing when installing composite so the structure has a better chance of keeping pace.
Thinking about a home with an older deck? Reach out to us and we can help you connect with a Front Range inspector who will get underneath and check the framing.