Radon Mitigation Crawl Space: What Homeowners Need to Know
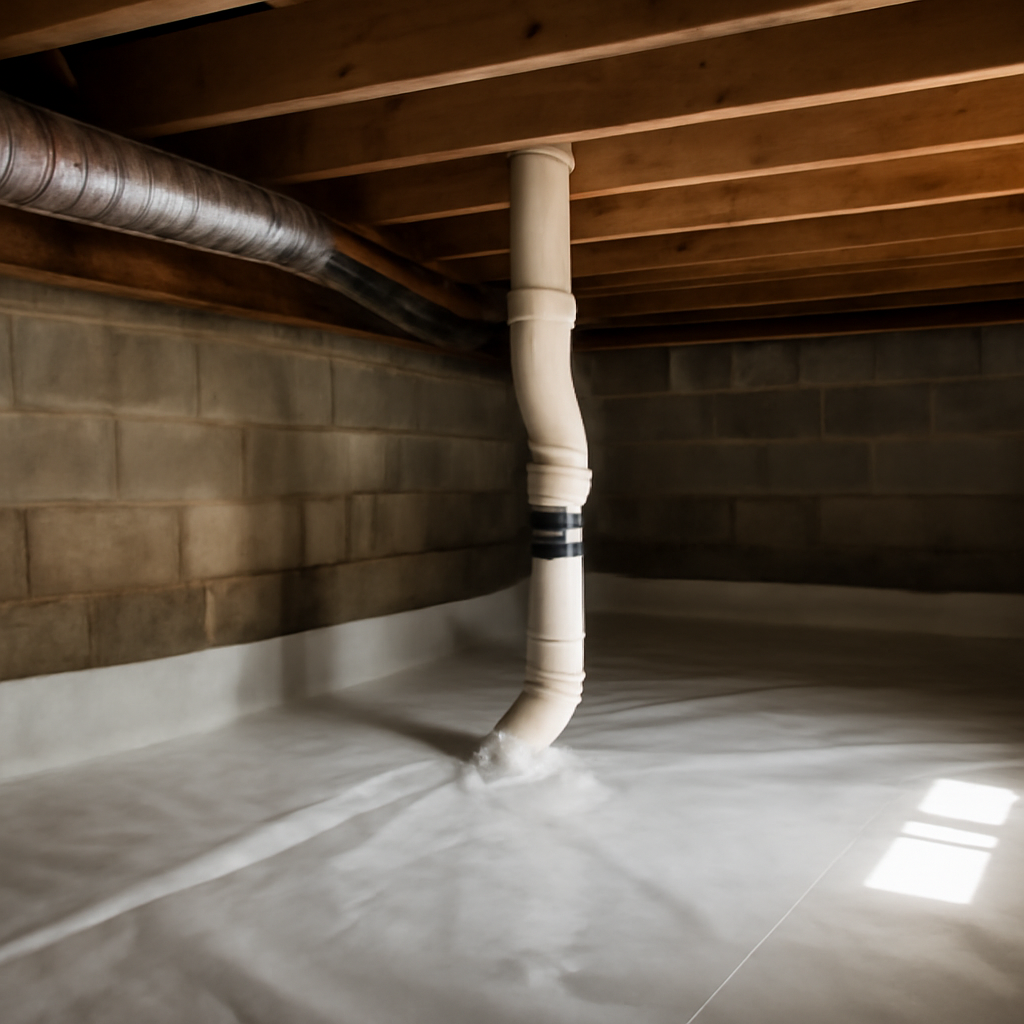
Homes with crawl spaces present a particular radon challenge. The soil sits just below the living area with little more than a dirt floor and some vents between it and the rooms above. Radon gas seeps up from that soil and into the house. The fix, called sub-membrane depressurization, is different from the slab systems used under basements, but it follows the same principle: capture the gas before it enters and vent it safely outdoors. This guide explains how radon mitigation in a crawl space works, what it costs, and how to know whether you need it. It summarizes EPA and Colorado Department of Public Health and Environment guidance current as of 2026 and is educational only — test your home and consult a certified mitigator before making decisions.
Part of our Radon Mitigation Systems guide — start there for the full picture →
How does radon mitigation work in a crawl space?
The standard approach for a crawl space is a sub-membrane depressurization system. A heavy-duty plastic membrane is laid across the entire crawl-space floor and sealed at the seams and to the foundation walls. A suction pipe is set beneath the membrane, connected to an in-line fan, and routed up and out above the roofline. The fan draws air and radon from under the membrane and exhausts it outside, creating a low-pressure zone that pulls gas away from the house instead of letting it rise into the rooms above.
This differs from a basement system, which draws from beneath a concrete slab. In a crawl space, the sealed membrane is the slab’s substitute — it becomes the barrier the fan depressurizes. Done well, the same membrane also cuts soil moisture, which helps with both air quality and structural humidity. The mechanics overlap with other system types, and our overview of how to remove radon from a home shows how the crawl-space method fits among them.
Some older crawl spaces relied on passive ventilation — open foundation vents meant to let outdoor air dilute soil gas. In practice, passive venting rarely lowers radon enough to meet the action level, and it works against energy efficiency by letting conditioned air escape in summer and cold air enter in winter. The modern approach seals the crawl space and actively depressurizes beneath the membrane instead, which both controls radon and improves comfort. A mitigator evaluating an old vented crawl space will usually recommend sealing it as part of the system rather than leaving the vents to do a job they cannot reliably do.
Why crawl spaces collect radon
Radon is a naturally occurring radioactive gas produced as uranium in soil and rock breaks down. It is colorless and odorless, and it rises from the ground into buildings through any opening it can find. A crawl space, with its exposed soil floor and gaps around the foundation, gives radon an easy path indoors.
The Front Range sits in EPA Radon Zone 1, the highest-risk category, where the predicted average indoor level exceeds the 4.0 pCi/L action threshold. Colorado’s geology and tightly built modern homes combine to push readings up. The EPA identifies radon as the second-leading cause of lung cancer overall and the leading cause among people who have never smoked, which is why mitigation is treated as a health measure, not a comfort upgrade.
Crawl spaces deserve extra attention because the soil sits so close to the living area. In a basement home, several feet of concrete and air separate occupants from the ground. Over a crawl space, the floor of the living area is often the only barrier, and gaps around plumbing penetrations, ductwork, and the rim joist give radon direct routes upward. The stack effect — warm air rising through the house and drawing replacement air up from below — actively pulls crawl-space air, and any radon in it, into the rooms above.
Moisture compounds the issue. Bare-soil crawl spaces are typically damp, and that humidity not only feeds mold and wood rot but also makes the space less comfortable to remediate. A sealed membrane addresses radon and moisture together, which is part of why mitigators favor the sealed-and-depressurized approach over open venting.
Components of a crawl-space radon system
Several parts work together. Knowing them helps you read a quote and judge install quality.
The sealed membrane
The membrane is the heart of the system. It must cover the full soil floor, overlap at the seams, and seal tightly to the foundation walls and any piers. Gaps or thin sheeting let the fan pull conditioned house air instead of soil gas, wasting energy and reducing performance.
The fan and piping
An in-line radon fan runs continuously, drawing gas from beneath the membrane through PVC piping that exits above the roof. The fan should be mounted outside the living space — in an attic, garage, or on the home’s exterior — so that any leak in the pressurized side of the pipe never discharges into occupied rooms. Our guide to choosing and sizing a radon system fan explains why airflow and static pressure ratings matter for crawl spaces.
Crawl-space systems often favor a higher-airflow fan because the membrane covers a large surface area and the gravel or soil beneath it can move a fair volume of air. The mitigator’s diagnostic test under the membrane guides the choice. The piping should rise from the suction point with as few sharp bends as possible, since each tight elbow costs airflow and makes the fan work harder.
The monitor and labeling
A pressure gauge, or manometer, on the pipe shows at a glance that the fan is pulling suction. Labels at the fan and electrical panel identify the system. A continuous radon monitor is the best way to confirm the system is keeping levels low over time.
What crawl-space radon mitigation costs
Crawl-space systems often cost more than basement slab systems because sealing a membrane across an entire dirt floor is labor-intensive, and access in low crawl spaces is awkward. Pricing depends on crawl-space size, headroom, how many separate areas must be tied together, and the fan and routing the home needs. A combined crawl-space-and-basement home can require more than one suction point.
Front Range homeowners should request itemized bids that break out the membrane, fan, piping, electrical, and post-installation testing. Our regional breakdown of radon mitigation cost in Colorado gives realistic local ranges so you can spot a bid that is unusually high or suspiciously cheap.
Access drives a surprising share of the cost. A crawl space with three feet of headroom and an easy hatch is far cheaper to seal than one with eighteen inches of clearance that forces a crew to work on their backs in the dirt. Obstructions like ductwork, plumbing, and support piers all slow the membrane installation and raise labor hours. Homeowners with tight crawl spaces should expect higher bids and should not assume the cheapest quote reflects the same quality of seal as the others.
One value to weigh: a sealed crawl-space membrane often pays dividends beyond radon. By cutting ground moisture, it can reduce humidity, discourage mold and wood rot, and improve the comfort of the floors above. When evaluating cost, factor in those secondary benefits rather than treating the project as a radon-only expense.
Testing before and after installation
Mitigation starts and ends with a test. A pre-installation measurement confirms the problem and sets a baseline; the EPA action level is 4.0 pCi/L, and lower is better. After the fan runs for at least 24 hours, a post-mitigation test verifies the system actually brought levels down. Reputable contractors include this clearance test in the job.
The pre-test does more than confirm there is a problem. It gives the mitigator a starting number to design around, and it helps set expectations for how much reduction the system needs to achieve. A home reading 12 pCi/L needs a more capable system than one reading 5 pCi/L, and the baseline informs fan selection and the number of suction points. Test under closed-house conditions in the lowest lived-in level so the baseline reflects realistic worst-case exposure rather than a ventilated snapshot.
Because radon fluctuates with weather and season, a continuous monitor or a follow-up test the next heating season gives extra confidence. Re-test every two years and after any major renovation or foundation work that could change how air moves through the home.
Common crawl-space mitigation mistakes
The most frequent failure is incomplete membrane coverage. If the plastic stops short of a corner, is not sealed to the foundation wall, or has unsealed seams, the fan pulls house air through those gaps instead of soil gas from beneath the membrane. The system then runs, hums, and shows suction on the gauge while doing little to lower radon. Full, well-sealed coverage is non-negotiable.
Another mistake is undersizing the fan for the crawl space’s conditions, or tying a large crawl space to a single suction point that cannot draw across the whole area. Large or divided crawl spaces sometimes need more than one suction point connected to the same system. A third error is poor membrane material — thin sheeting tears underfoot during future maintenance and breaks the seal. Reinforced membranes rated for crawl-space use hold up far better.
Finally, skipping the post-installation test leaves everyone guessing. A system that looks complete is not proven until a test confirms levels dropped below 4.0 pCi/L. Insist on that verification before considering the job finished.
Crawl-space mitigation and home value
For buyers and sellers on the Front Range, a documented crawl-space radon system is an asset. Many Colorado buyers now expect radon testing as part of due diligence, and a home with a properly installed, verified system removes a point of friction at the inspection contingency. Sellers who address an elevated crawl-space reading before listing often avoid last-minute price concessions.
Keep the paperwork: the pre-mitigation test, the system design, the post-mitigation result, and the fan warranty. That documentation reassures a buyer that the work was done to standard and that the home’s radon level has been measured, not merely assumed.
Maintaining a crawl-space radon system
Once installed, a crawl-space system asks little of the homeowner, but a few periodic checks keep it honest. Glance at the manometer on the pipe; the offset liquid columns confirm the fan is pulling suction, while a flat reading means the fan has failed. Listen for the fan’s steady hum, and treat any new rattle or silence as a prompt to investigate. Keep the exterior exhaust outlet clear of nests and debris.
Inspect the membrane when you access the crawl space for any reason. Look for tears, lifted seams, or spots where the seal has pulled away from the foundation wall, since these gaps let the fan pull house air and quietly degrade performance. Repair damage promptly with compatible sealing materials, or call the installer for larger fixes. A continuous radon monitor running in the lowest lived-in level is the best long-term safeguard, flagging any rise before it becomes a prolonged exposure.
When to call a professional
Call a certified radon mitigation contractor when a test shows 4.0 pCi/L or higher, when you are buying a home with a crawl space and want it addressed before closing, or when an existing system’s manometer reads zero. Sealing a membrane and routing a fan correctly is specialized work; an undersized fan or a poorly sealed membrane can leave levels nearly as high as before. In Colorado, mitigation professionals should hold national certification through the AARST-NRPP or NRSB programs. Ask for that credential, plus a written post-mitigation test result, before you pay the final invoice.
References
- A Consumer’s Guide to Radon Reduction — U.S. Environmental Protection Agency
- Radon Information for Colorado Residents — Colorado Department of Public Health and Environment
- Health Risk of Radon — U.S. Environmental Protection Agency
Frequently asked questions
How is crawl-space radon mitigation different from a basement system?
A basement system draws radon from beneath the concrete slab. A crawl space has no slab, so a sealed plastic membrane is laid over the soil and the fan depressurizes beneath that membrane instead. The membrane is the key extra component.
Does the membrane really need to cover the whole crawl space?
Yes. Full coverage with sealed seams and edges is what lets the fan create suction across the soil. Gaps let the fan pull conditioned house air, which wastes energy and leaves radon levels high.
Why is crawl-space mitigation often more expensive?
Sealing a membrane across an entire dirt floor is labor-intensive, and low headroom makes the work slow and awkward. Homes that combine a crawl space and basement may also need more than one suction point.
How do I know the system is working?
Check the manometer on the pipe — it should show suction, not zero. Then confirm with a post-installation radon test after the fan has run at least 24 hours, and re-test every couple of years.
If your Front Range home has a crawl space and you haven’t tested for radon, that’s the place to start. Get in touch through our contact page and we’ll connect you with a certified local tester and mitigation pro who knows Colorado’s Zone 1 conditions.
Test your home for radon
Radon is invisible and odorless, so a test is the only way to know your level. A short-term kit gives a first reading in days; a digital monitor tracks it over time.
| Product | Why | Buy |
|---|---|---|
 AirChek Charcoal Radon Test Kit AirChek Charcoal Radon Test Kit | Lab fee usually included; EPA short-term protocol. | Amazon — $21.95 |
 First Alert RD1 Radon Test Kit First Alert RD1 Radon Test Kit | Widely stocked; 48-hour charcoal test. | Amazon — $16.98 |
 Airthings Corentium Home Airthings Corentium Home | Digital monitor with a long-term average. | Amazon — $147.14 |