How to Recognize Black Mold: A Visual ID Checklist for 2026
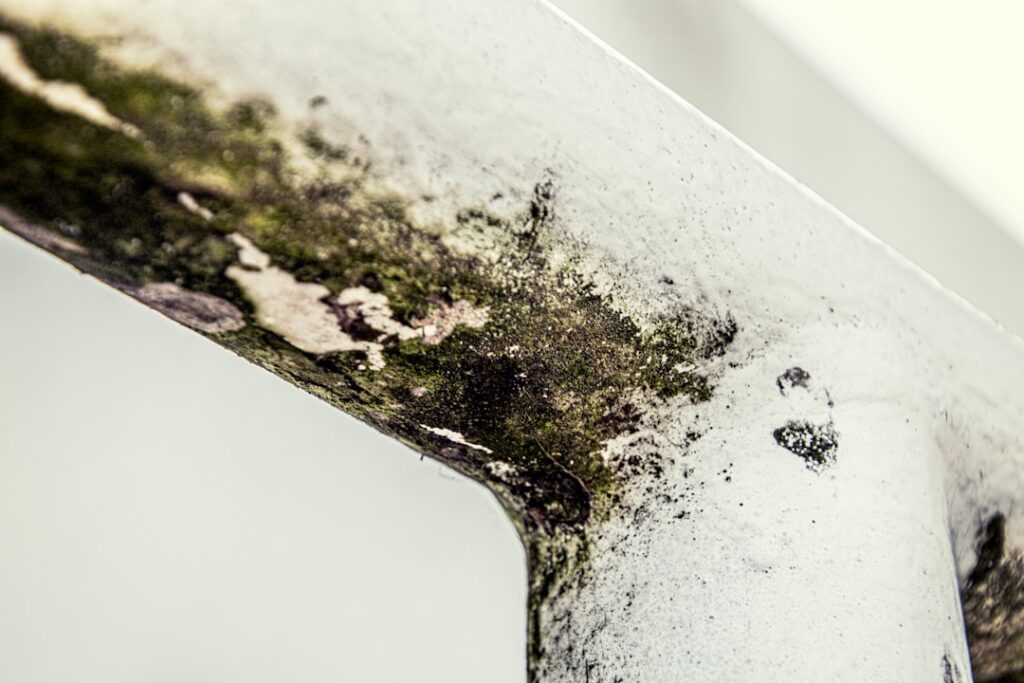
Recognizing black mold reliably requires reading several clues at once. No single visual marker is dispositive, but a clear checklist — color, texture, location, substrate, smell, and moisture history — turns guessing into a working hypothesis. A homeowner with a flashlight, a moisture meter, and an organized approach can usually narrow the field to one or two likely species before any lab work. This guide summarizes EPA and CDC guidance current as of 2026 — consult a certified mold inspector for testing decisions and your physician for health-symptom evaluation. The checklist below is structured to walk through each clue in the order professional inspectors typically use.
Is this mold, asbestos, or water damage? Get a free instant screen
Upload a clear photo of the suspect area. You'll get an instant AI screening opinion and what to do next. This is screening guidance, not a professional determination.
Screening guidance only. AI can be wrong. Confirm asbestos, mold type, or lead with lab testing or a licensed professional before acting.
The Six-Item Recognition Checklist
Professional inspectors evaluate visible mold against six factors: color (with its shifts across the colony lifecycle), texture (slimy versus dry-fuzzy), location within the building (water-prone surfaces), substrate (cellulose versus inorganic), smell (the characteristic mVOC signature), and moisture history (chronic versus brief). Each factor adjusts the probability of specific species. None on its own confirms anything, but the combined pattern often narrows the field to one or two strong candidates before lab work begins.
Color Recognition Step by Step
Step one is observing color carefully under good light. A daylight LED reveals subtle hue differences a yellow incandescent bulb hides. True Stachybotrys colonies often appear greenish-black rather than pure black. Aspergillus niger appears pure black with a peppery surface. Cladosporium tends olive-black to near-black on cool surfaces. Color can also shift across a single colony — outer edges often differ from the center as the colony matures and produces spore masses at different rates.
Texture Recognition Step by Step
Step two is texture. Use a flashlight at an angle (raking light) to reveal three-dimensional surface details. Slimy, wet-looking, gelatinous growth suggests Stachybotrys chartarum. Dry, peppery, powdery growth that disturbs easily suggests Aspergillus niger. Velvety, surface-only growth suggests Cladosporium. Cottony, fuzzy growth suggests Chaetomium. Woolly dark growth on damp soft surfaces suggests Alternaria. Do not touch the colony without PPE; observation alone is sufficient at this stage. For a visual reference, see our guide on black mold texture identification.
Location Recognition Step by Step
Step three is location. Specific locations bias the species probability strongly. Slimy black growth on saturated drywall behind a leaking dishwasher fits Stachybotrys. Peppery black on damp drywall after a humidity event fits Aspergillus niger. Olive-black on a windowsill that condenses in winter fits Cladosporium. Cottony black-brown growth on flooded basement framing fits Chaetomium. Dark growth on a shower-curtain bottom fits Alternaria mixed with Serratia. Location patterns are some of the strongest hints available before sampling.
Substrate Recognition Step by Step
Step four is substrate. Cellulose materials (drywall paper, ceiling tile, paper-backed wallpaper, cardboard, wood) favor Stachybotrys and Chaetomium. Hard non-porous surfaces (tile, glass, metal) cannot support Stachybotrys growth and almost always host Cladosporium or Aspergillus when colonized. Grout is technically porous but mineral-based; black growth on grout is almost never Stachybotrys. Substrate often eliminates species from consideration even when color and texture would otherwise allow them.
Smell Recognition Step by Step
Step five is smell. Close yourself in the room for 30 seconds with the door shut and sniff deliberately. Earthy, basementy, “wet newspaper” smells suggest Stachybotrys. “Old book” or sharper musty smells suggest Aspergillus. Milder generic mustiness suggests Cladosporium. Sour-sweet smells suggest Penicillium. Smell fades as colonies dry, so noting whether smell intensifies with humidity is itself diagnostic — humidity-responsive smell almost always indicates active growth.
Moisture History Recognition Step by Step
Step six is moisture history. Has the area been wet for days, weeks, or months? Was the wetting event a one-time spill or a chronic leak? Chronic wet conditions favor Stachybotrys and Chaetomium. Brief moisture events that are not adequately dried can support Aspergillus and Penicillium growth within days. Condensation cycles support Cladosporium and Aureobasidium. Reconstructing moisture history from baseboard staining, paint bubbling, and homeowner memory is part of every inspection.
Building a Working Hypothesis
With six clues in hand, the working hypothesis emerges. A slimy greenish-black colony on saturated drywall behind a dishwasher with months of slow leak history points strongly at Stachybotrys, possibly with Chaetomium. A peppery black colony on bathroom-fan duct insulation after summer humidity points at Aspergillus niger. An olive-black colony on a windowsill that has condensed all winter points at Cladosporium. Each combination of clues yields a probability-weighted hypothesis rather than a guess.
What the Checklist Cannot Confirm
The six-item checklist narrows but does not confirm. Several species can present similarly under specific conditions. Mixed colonies are common in chronically water-damaged buildings. Lab analysis — a tape-lift sample sent to an accredited environmental microbiology lab — is the only reliable identification. Lab fees run $35 to $50 per sample with turnaround in three to seven business days. Our guide on how to confirm black mold identification walks through the sampling step in more detail.
The HVAC Recognition Subset
HVAC systems deserve a separate recognition pass because the environment differs from finished interior surfaces. A dark line of dust around supply-register grilles in rooms without other moisture problems suggests recirculated spore distribution. A slimy biological film on the cooling coil suggests local growth. A condensate pan with standing water and a faint smell suggests developing contamination. The InterNACHI mold standard treats HVAC findings as immediate-attention items because the system distributes whatever is growing inside it.
The Hidden-Source Recognition Pattern
Sometimes the recognition checklist finds nothing visible but other indicators are strong — persistent smell, occupant symptoms, elevated moisture meter readings. This pattern recognition itself is meaningful. Hidden mold investigation moves to infrared imaging, more aggressive moisture mapping, and air sampling with calibrated spore-trap cassettes. The recognition that a building has hidden mold often precedes finding it by days or weeks; the patience to investigate properly avoids destructive opening of clean walls.
Common Misrecognitions
Several non-mold substances are routinely misidentified as black mold. Soot from candles, gas fireplaces, or kerosene heaters can deposit on cool ceilings and walls as black streaks. Oxidized adhesive that has bled through paint can appear as dark spots. Dust accumulation on textured surfaces can read as growth. Spider webs collecting fine dark dust look like colonies in flashlight beams. The wipe test — does material come off on a cloth, does it grow back — usually separates non-mold from mold.
Recognition in Outdoor-Adjacent Areas
Surfaces near doors, windows, and HVAC fresh-air intakes have higher outdoor spore loads and may show dark growth that originated outdoors. Cladosporium and Alternaria are abundant outdoors and drift in. Growth on a window frame near regular condensation is often a hybrid of indoor (condensation-driven) and outdoor (drift-in) sources. Distinguishing source matters less than addressing the condensation that allowed colonization.
When Recognition Leads to Sampling
Recognition leads to sampling when the species identification will change the remediation plan, when insurance documentation is required, when occupants have symptoms warranting evidence, or when the working hypothesis cannot narrow the field below two strong candidates. A tape-lift sample is straightforward to take with clear cellophane tape pressed against the visible colony, peeled off, and sent to the lab in a padded envelope. Our overview of how lab sampling integrates with inspection covers the sequence.
Habits That Build Recognition Skill
Homeowners who walk their building methodically every six months — flashlight, hygrometer, moisture meter, notebook — build recognition skill that catches problems early. Photographing baseline conditions in known damp areas gives comparison points later. Knowing which rooms drift damp and which stay dry lets you focus attention. Recognition is partly knowledge and partly familiarity with your specific building’s tells.
Front Range Recognition Patterns
Front Range homes show recognition patterns specific to the regional climate. Winter condensation produces Cladosporium on north-facing windowsills with consistent appearance year to year — recognizing the seasonal pattern helps distinguish normal seasonal growth from new problems. Spring snowmelt produces basement wall growth at consistent locations along the foundation perimeter. Summer monsoon events produce localized ceiling staining under known roof leak points. Each pattern repeats predictably, and the homeowner who walks the same building over years develops a recognition vocabulary specific to their property’s quirks. New growth in unexpected locations warrants more attention than predictable seasonal returns at known sites.
Tools That Improve Recognition Accuracy
A few inexpensive tools meaningfully improve homeowner recognition accuracy. A 1,000-lumen daylight LED flashlight ($20 to $40) gives accurate color rendering for visual evaluation. A pin-style moisture meter ($30 to $50) confirms whether substrates are actually wet. A handheld hygrometer ($15 to $25) tracks room-level humidity. An inspection mirror on a telescoping handle ($10 to $20) lets you see behind appliances and inside cabinets without moving them. A camera (the one on your phone is usually adequate) documents findings. The total under-$100 toolkit puts homeowner recognition meaningfully closer to inspector-level evaluation for routine checks.
The Raking Light Technique in More Detail
Raking light is a useful inspection technique that reveals texture and three-dimensional details flat light hides. Hold the flashlight nearly parallel to the surface being examined, so the light strikes the surface at a low angle. Subtle textural differences — the three-dimensional bumpiness of early-stage mold colonies, the slight swelling of damp drywall under paper, the seam where wallpaper has lifted from the wall — become visible. Use raking light from multiple angles when examining a suspect area. The technique is borrowed from art conservation and works equally well for buildings.
Recognition Errors to Watch For
Several recognition errors are common and worth knowing. Mistaking spider-web debris for mold colonies on flashlight beam. Mistaking efflorescence (chalky white salt from concrete) for white mold. Mistaking oxidized adhesive bleed-through for dark mold spots. Mistaking soot from candles or fireplaces for black mold streaks. Mistaking shadow patterns in textured ceilings for colonies. Each error wastes effort if not caught early. The wipe test (does material come off on a cloth) and the regrowth test (after wiping, does it return) separate true mold from look-alikes in most cases.
Recognition Patterns Across Building Eras
Different construction eras produce different recognition patterns. Pre-1978 homes often have unsealed crawl spaces, single-pane windows, and original plumbing — favoring Cladosporium on windows and Stachybotrys behind original plumbing fittings. 1980s-1990s homes have vinyl wallpaper in many bathrooms and kitchens, a Stachybotrys-favoring substrate when applied to damp walls. 2000s and newer construction has tighter envelopes that can trap interior moisture if mechanical ventilation is inadequate, producing condensation-driven Cladosporium on exterior-wall closets. Knowing the building’s construction era guides where to look.
The “Two of Six” Threshold for Sampling
One practical heuristic: if a colony’s recognition profile matches Stachybotrys on two or more of the six checklist factors (color, texture, substrate, smell, moisture history, surrounding water staining), lab confirmation is worth the cost. If it matches Cladosporium on most factors, surface cleaning is usually the appropriate response. If the picture is mixed or ambiguous, lab confirmation removes the ambiguity. The threshold matters because it converts qualitative recognition into a decision rule about when to spend money on sampling and when to spend it on cleanup.
References
- A Brief Guide to Mold, Moisture, and Your Home — U.S. Environmental Protection Agency
- About Mold — Centers for Disease Control and Prevention
- Mold Inspection Standards of Practice — InterNACHI
- Mold and Indoor Health — National Institute of Environmental Health Sciences
If a working hypothesis from the checklist points at toxic black mold but you want lab confirmation before any remediation, connect with a Front Range mold inspector through our contact page. Professional sampling with chain-of-custody documentation strengthens any insurance or real-estate filing the case may eventually require.